Auditing shared folder access and changes is crucial for several reasons. Firstly, it helps ensure data security and protect sensitive information. By monitoring who has accessed shared folders and tracking changes made, organizations can detect unauthorized access or suspicious activities, helping prevent data breaches and unauthorized disclosures.
Secondly, auditing shared folder access and changes promotes accountability and transparency. It allows organizations to hold individuals accountable for their actions, as each access and modification is recorded and attributed to a specific user. This can deter employees or other users from engaging in inappropriate or malicious activities, fostering a culture of responsibility.
Thirdly, auditing facilitates compliance with regulatory requirements and industry standards. Many regulations, such as the General Data Protection Regulation (GDPR) and the Health Insurance Portability and Accountability Act (HIPAA), mandate organizations to implement controls and audit trails for data access and changes. By conducting audits, organizations can demonstrate compliance and avoid legal and financial repercussions.
In this article, we will discuss two methods by which you can audit shared folder access and changes. One is using the native method, and the other is using Lepide File Server Auditor.
Steps to Track Changes Made to Files in a Shared Folder with Native Auditing
Below are the steps to enable auditing and track events in event logs
Step 1: Configuring the policies
- Type “GPMC.msc” in the “Command Prompt” or “Run” dialogue box to open “Group Policy Management” console.
- Navigate to “Forest” ➔ “Domains” ➔ “www.domain.com”
- Right-click default domain policy or customized policy under “Domain Controllers” node
Note: We recommend you to create a new Group Policy Object (GPO), link it to the domain and then edit.
- To access “Group Policy Management Editor”, click “Edit” in the context menu.
- Go to “Computer Configuration” ➔ “Policies” ➔ “Windows Settings” ➔ “Security Settings” ➔ “Local policies” ➔ “Audit policy” ➔ “Audit object access” policy
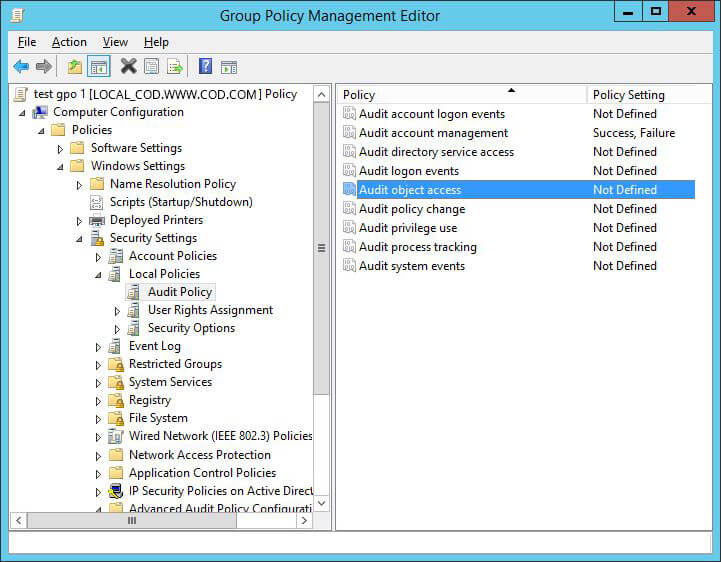
Figure 1: “Group Policy Management Editor” - Double-click “Audit object access” policy to open “Properties” window.

Figure 2: Enable audit policy for “Success” and “Failure” - Click “Define these policy settings”.
- Select “Success” and “Failure” checkboxes. Click “Apply” and “Ok”.
- Navigate to “Advanced Audit Policy Configuration” ➔ “Audit Policies” ➔ “Object access”.
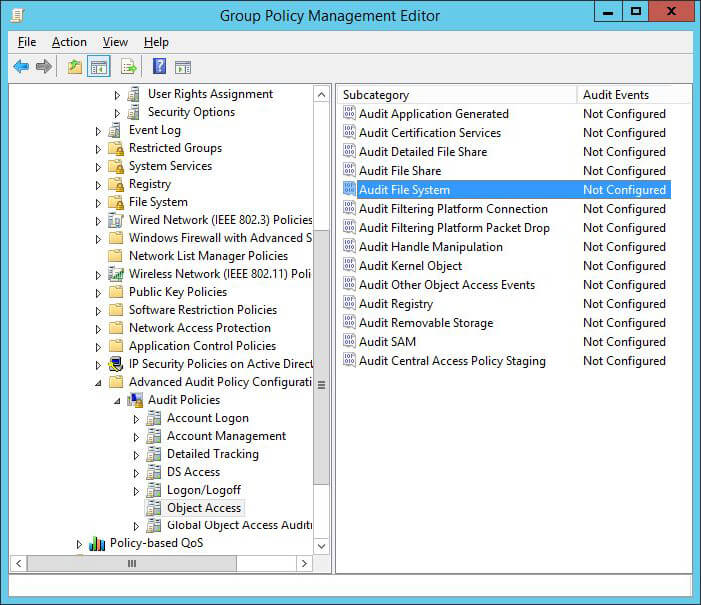
Figure 3: Advanced security policies - Configure “Audit File System” policy and “Audit Handle Manipulation” policy.
- Open their respective “Properties” window and define the settings for both “Success” and “Failure” events.
- Click “Apply” and “Ok” after enabling both audit policies.
- To apply policy on the domain, execute the following command in “Command Prompt”:
gpupdate /force
Step 2: Configure auditing on the file/folder you want to track
You have to perform the following steps at the file or folder. If you perform them on a folder, these settings can be selected to be applied to its sub-folders and files.
- Open “Windows Explorer” and navigate to file share that you want to audit.
- Right-click the file and click “Properties” in the context menu.
- Switch to “Security” tab and click “Advanced” button to open “Advanced Security Settings”
- Switch to “Auditing” tab which displays already existing auditing entries.
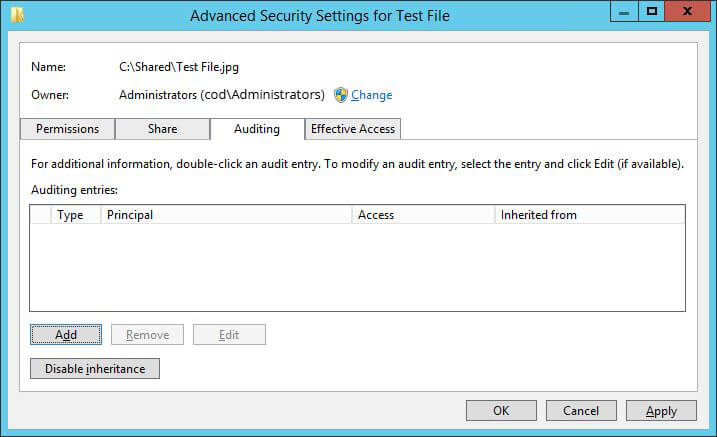
Figure 4: “Auditing” tab in “Advanced Security settings” window - Click “Add” to create a new auditing entry. The “Auditing Entry” window opens up on the screen.
- Now click “Select a Principal” to choose the users whose activities you want to track. For tracking the activities of all the users, enter “Everyone” in “Enter the object name” box.
- Click “Ok” after finalizing your selection.
- Select “All” option from “Type” drop-down menu.
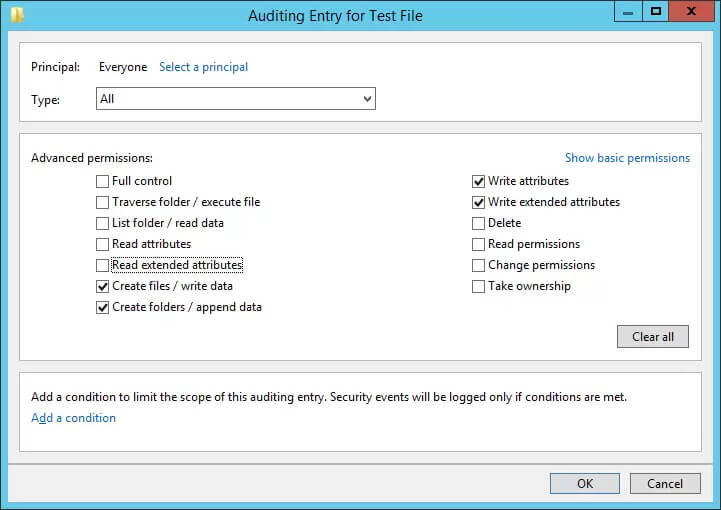
Figure 5: Configuring auditing entry - In the Permissions section, click “Show advanced permission” and select the following:
- Create files/ write data
- Create folders/ append data
- Write attributes
- Write extended attributes
- Click “Ok” to close the “Auditing entry” window. It takes you back to “Auditing” tab of “Advanced Security settings” window.
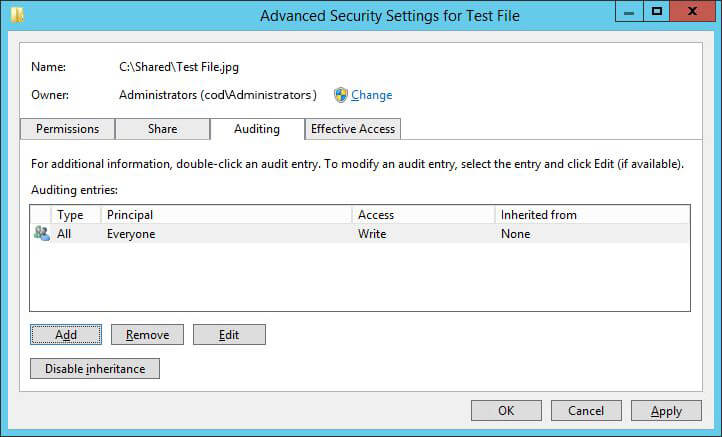
Figure 6: Auditing entry “Advanced Security settings” window - Click “Apply” and “Ok” and close file “Properties”.
Step 3: Tracking events in the “Event Viewer”
- Let us have a look at the steps to track events:
- Open “Event Viewer”.
- Expand “Windows Logs” and select “Security”.
- Click “Filter current log”.
- Event ID 4656 is generated whenever an application attempts to access an object (as per the set audit policy) but does not necessarily mean that any permissions were exercised.
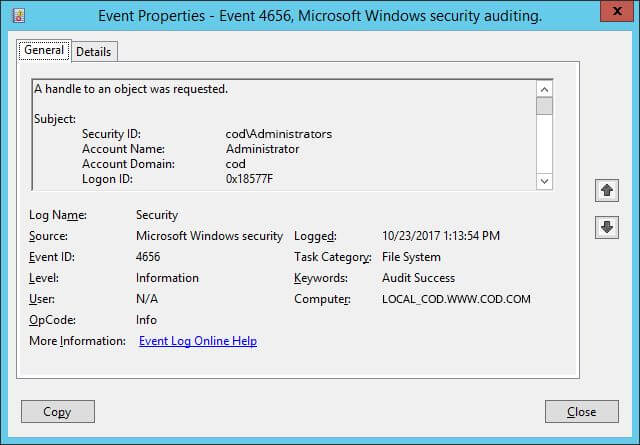
Figure 7: Event ID 4656 with event details - Event ID 4658 determines the duration for which an object was open.
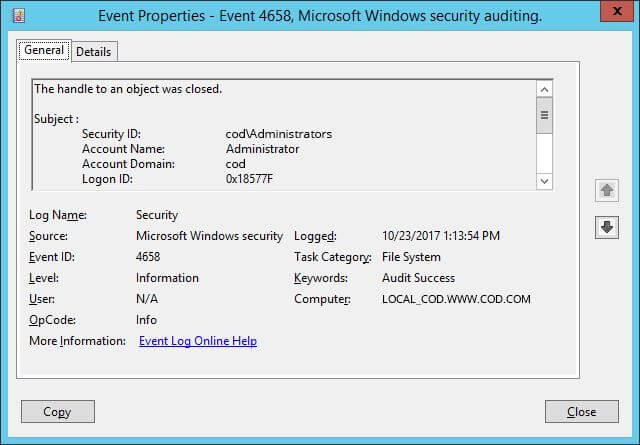
Figure 8: Event ID 4658 with event details - Event ID 4663 indicates if permissions like read, write, delete or rename have been exercised.
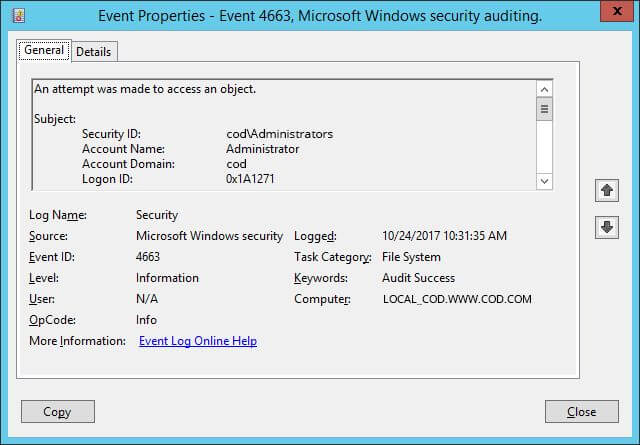
Figure 9: Event details of accessed permissions 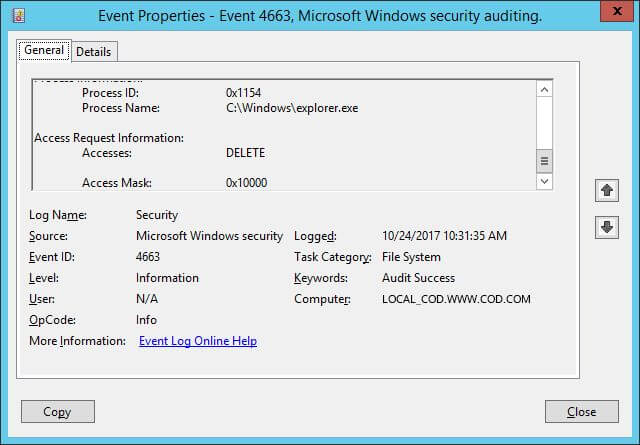
Figure 10: “Access Request Information” details of the event - The type of permission accessed is indicated by “Accesses” in the event details.
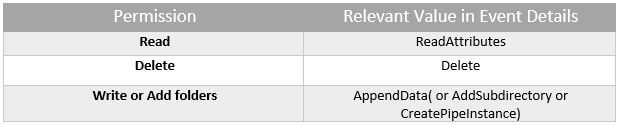
Table 1: List of Permissions matching to their values in Event Details
How Lepide File Server Auditor Audits Shared Folder Access and Changes
Lepide File Server Auditor empowers you with the ability to detect critical changes in your business enterprise without having to put in any manual effort. Granular reporting and real time alerts are just a few of the features that help you automate otherwise time-consuming tasks.
Lepide File Server Auditor has the ability to report on all user behavior related to File Server, including whether shared folders are being accessed, or whether changes are being made to shared folders. Lepide presents this data in clear, easy-to-read reports that condense noisy event logs into a single pane of glass. Lepide can also report on user behavior related to individual files and folders in the same way, including who is copying, moving, modifying and deleting data.
Below is an example of one report from Lepide in which we are looking at all modifications in shared files and folders. You can see the critical who, what, where and when information is displayed front and center.
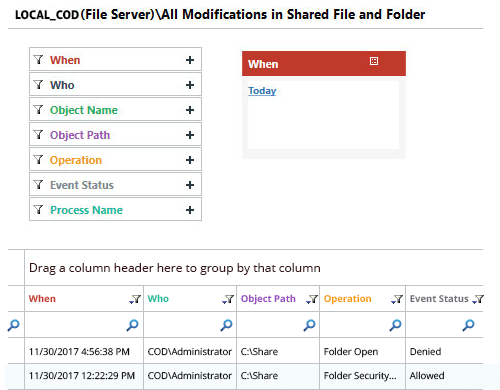
You can see here how easy it is to dive into all changes being made to shared files and folders. Why don’t you download the free trial of Lepide’s File Server auditing solution today and try it out for yourself?
