In any enterprise that uses file servers to store and share data, auditing is important to ensure data security. Proper monitoring of all file servers in your domain can help you to spot unwanted or potentially damaging events, including file accesses and read events on files containing sensitive data.
In this article, you will see how to track who accesses files on Windows File Server in your organization using Windows Event Logs. At the end of the article, you will also see how much simpler the process is when using Lepide File Server Auditor.
Here are the steps to track who read a file on Windows File Server.
- Configure ‘Audit Object Access’ audit policy
- Enable auditing on the files that you want to track
- Search relevant Event IDs in Windows Event Viewer to track who reads the file
Step 1 – Configure ‘Audit Object Access’ policy
Follow these steps one by one to enable the “Audit object access” audit policy:
- Launch “Group Policy Management” console. For that, on the primary “Domain Controller”, or on the system where “Administration Tools” is installed, type “gpmc.msc” in the “Run” dialog box, and click “OK”.
- After you have opened the “Group Policy Management” window, you will have to create a new GPO, or edit an existing one.
- To edit an existing GPO, in the left pane, right-click on the default or a user-created GPO, and click “Edit” on the context menu. This action opens the Editor window of Group Policy Management Editor.
Note: If you want to track multiple folders, you will have to configure an audit for every folder individually.
- Navigate to “Security” tab.
Note: It is suggested to create a new GPO, link it to the domain, and edit it.
- In the “Group Policy Management Editor” window, you have to set the appropriate audit policy.
- To audit file accesses, you have to set the “Audit object access” policy. For that, navigate to “Computer Configuration” → “Windows Settings” → “Security Settings” → “Local Policies” → “Audit Policy”. All the available policies under “Audit Policy” are displayed in the right panel.
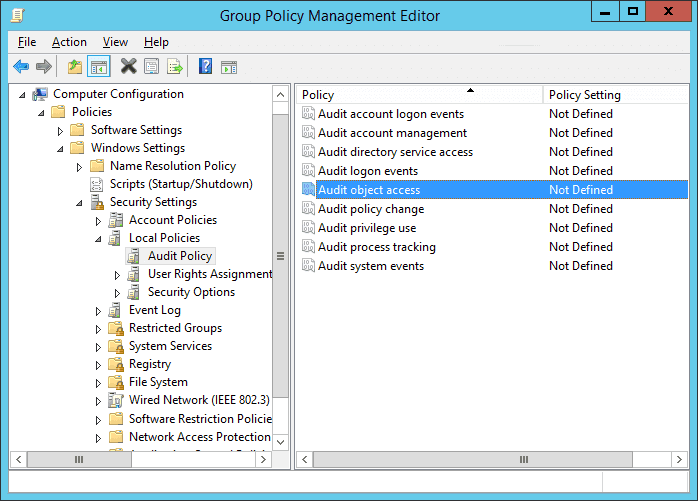
Figure 1: “Audit Object Access” policy - Double-click the “Audit object access” policy to open its “Properties”.
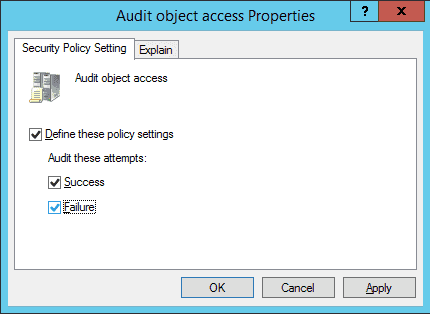
Figure 2: Properties of Audit Object Access Policy - On this window, click the “Define these policy settings” checkbox. Then, you get two options to audit – “Success” and “Failure”. The former lets you audit successful attempts made to access the objects, whereas the latter lets you audit failed attempts.
- Select any one or both the options as per requirement. It is recommended to select both options. In our case, we have selected both options because we want to audit both the successful and the failed attempts.
- Click “Apply” and “OK” to close the window.
- To immediately update the Group Policy instead of waiting for it to auto-update, run the following command in the “Command Prompt”:
Gpupdate /force
Step 2 – Enable auditing on the files that you want to track
After configuring GPO, you have to set auditing on each file individually, or on folders that contain the files. Here are the steps:
- Open “Windows Explorer” and navigate to the file or folder that you want to audit.
- Right-click the file and select “Properties” from the context menu. The file’s properties window appears on the screen.
Note: If you want to track multiple files, put them into one, two or more folders to enable their auditing easily. Doing this saves you from repeating these steps for each file.
- By default, the “General” tab of the “Properties” window appears on the screen. Go to the “Security” tab.
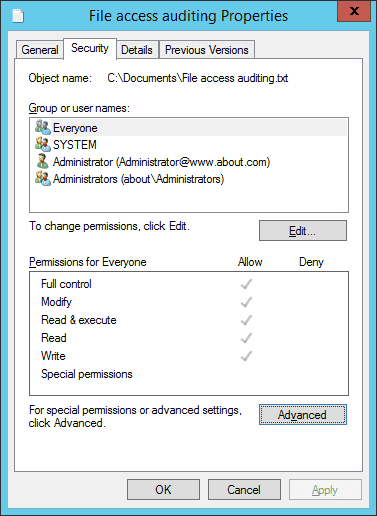
Figure 3 Auditing tab of “Advanced Security Settings” - On the “Security” tab, click “Advanced” to access the “Advanced Security Settings for” window that appears on the screen.
- In the “Advanced Security Settings for” window, go to the “Auditing” tab.
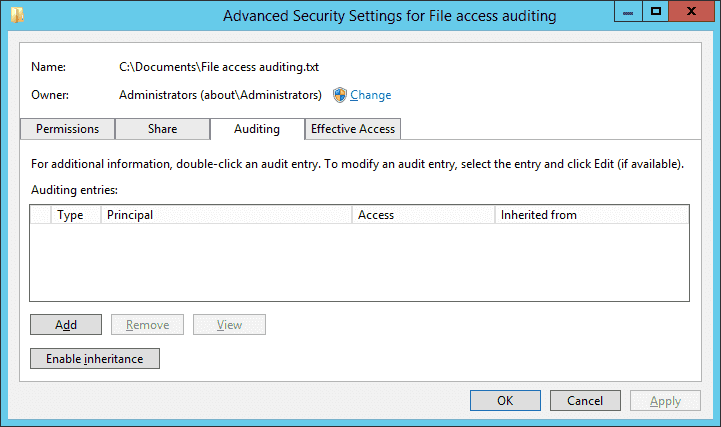
Figure 4: Select User, Computer, Service Account, or Group - On this tab, you have to create a new audit entry. For that, click “Add”. The “Auditing Entry for” window appears on the screen.
- In the “Auditing Entry for” window, at first, select users whose actions you want to audit. Click “Select a Principal”, to open the “Select User, Computer, Service Account, or Group” dialog box.
- Here, choose users to audit. If you want to audit all users’ activities, enter “Everyone” in the “Enter the object name to select” field, and click “Check Names”. In our case, we enter “Everyone”.
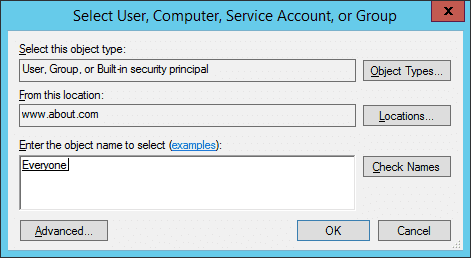
Figure 5: “Auditing Entry” window of the file - Click “OK” to close the dialog box.
- Three options are available in the “Type” picklist: “Success”,” Fail”, and “All”. We select the “All” option because we want to audit both successful and failed attempts.
- In the “Permissions” section, you can select all activities that you want to audit. In the case of audit file read, select “Traverse Folder/Execute File”, “List Folder/Read data”, “Read attributes”, and “Read extended attributes” permissions.
NOTE: If you want to audit all the activities, select the “Full Control” checkbox.
- Click “OK” to close the “Auditing Entry for File Access auditing” window.

Figure 6: The file access event - Back in the “Advanced security settings” window, now you see the new audit entry.
- Click “Apply” and “OK” to close the window.
- Click “Apply” and “OK” to close file properties.
Step 3 – Search relevant Event IDs in Windows Event Viewer
To see who reads the file, open “Windows Event Viewer”, and navigate to “Windows Logs” → “Security”. There is a “Filter Current Log” option in the right pane to find the relevant events.
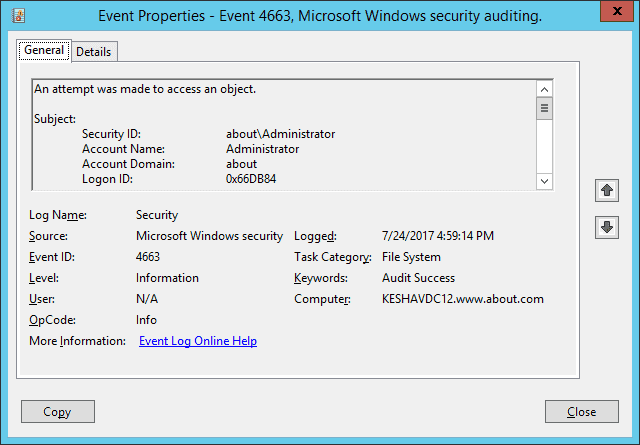
If anyone opens the file, event ID 4656 and 4663 will be logged. For example, in our case, someone opened the file (File access auditing.txt), and as shown in the following image, a file access event (ID 4663) was logged. You can see who accessed the file in the “Account Name” field and access time in the “Logged” field.
In the below image, you can see the file’s name (C:\Users\Administrator\Documents\New Text Document.txt), which is visible after you scroll down the sidebar, under the “Object Name” field.
In the next section, you will see how Lepide File Server Auditor can make file auditing even quicker and straightforward.
How Lepide File Server Auditor Helps
At Lepide, we understand the role that File Server auditing plays in keeping your sensitive, unstructured data secure. Tracking and auditing file-read events on Windows File Servers and other changes occurring to sensitive data on File Servers couldn’t be easier with Lepide File Server Auditor. The below image shows our “Read Successful” report, just one of the hundreds of File Server audit reports available on the platform. The answers to critical audit questions regarding file access are displayed in a single pane of glass.
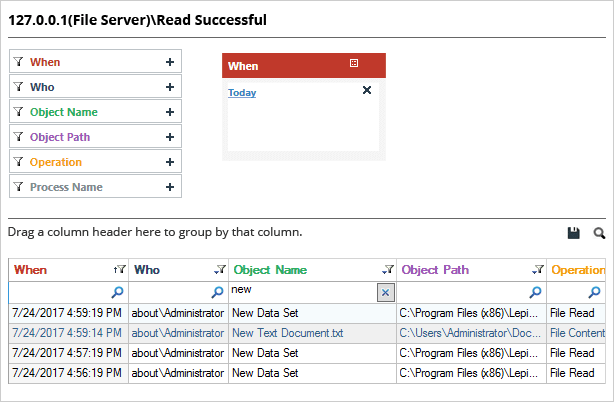
In the above image, you can see the same file read the report (C:\Users\Administrator\Documents\New Text Document.txt) in Lepide File Server Auditor. The event is highlighted, and all the audit information like who accessed the file, when, and from which system is available in a single line record.
To generate this report, you simply need to select it from a list of file server auditing reports and apply the filter you want. It couldn’t be easier.
File Server Auditing Made Simple, With Lepide
In this article, we’ve covered the native method of tracking file read events in Windows File Servers using event logs. We’ve also shown you how much easier the process is made by using Lepide. In addition to providing detailed audit information on file-read events, Lepide can also track and audit numerous other critical File Server security changes/interactions. Using Lepide File Server Auditor, you can:
- Locate and classify files containing sensitive data.
- Track files being copied, moved, modified, and deleted.
- Analyze user behavior and spot anomalies
- Spot users with excessive permissions and implement zero trust by changing permissions
