Administrators are often required to get a list of Active Directory (AD) users and then export this list to CSV for further processing and analysis.
Active Directory functionality does not include a tool for exporting a list of users so the only free tool available to export AD usernames to CSV is PowerShell. This can be a limitation as not every admin user has the necessary PowerShell scripting skills and providing access to a domain controller just to perform a simple task like this is a huge security risk. So, an alternative tool to enable the export of Active Directory users to CSV is an essential requirement.
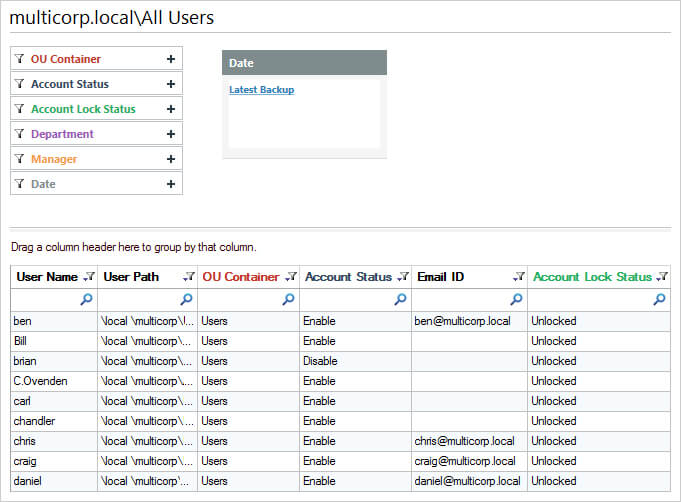
The Lepide Auditor for Active Directory provides this functionality with the All Users Report. This report lists all Active Directory users and this output can then be exported to CSV.
Here, these two ways to generate and export a list of user accounts created in Active Directory are explained:
- Using the PowerShell
- Using the Lepide Auditor for Active Directory
Using PowerShell to Export AD Users to CSV
Running a PowerShell Script:
- Run the following script changing the export path as required:
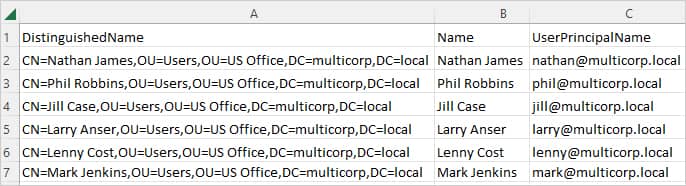
$ExportPath = 'c:\adusers_list.csv’ Get-ADUser -Filter * | Select-object DistinguishedName,Name,UserPrincipalName | Export-Csv -NoType $ExportPath - Open the CSV file generated from the script in Excel to see the results:

Exporting AD Users to CSV Using Lepide Auditor for Active Directory
An alternative, more straightforward, solution to this native method is to use the All Users Report from the Lepide Auditor for Active Directory. This report lists all current Active Directory users which can then be exported to CSV:

To Generate the All Users Report:
- Click the User & Entity Behavior Analytics

- Click Generate Report
- The report will run and can be sorted, filtered, grouped, saved, and exported

To Export the Report to CSV:
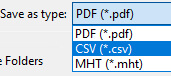
- Click Save, Browse and choose a location to save the file
- Enter a File Name and choose the CSV file type from the Save as Type list:
- Click Save
- Click Finish
