Are you storing your essential data on SharePoint Server? If yes, then you will need to proactively be auditing permission changes in SharePoint Server. In many cases, employees are given excessive privileges and inadvertently leak, delete or distribute confidential files that they should never have had access to in the first place. To ensure the security of your SharePoint data, it is essential to detect permission changes the moment they occur. In this article, the steps to audit SharePoint Server’s permission changes are explained through native method and by using Lepide SharePoint Auditor.
Steps to Audit Permission Changes in SharePoint with Native Auditing
Step 1- Enable Auditing
Following are the steps for enabling native auditing:
- Open “SharePoint 2013 Central Administration” → Go to “Settings” → “Site Settings”
- Navigate to “Site Collection Administration” → “Site collection” audit settings
- Next, select “Editing users and permissions”, and click “OK”

Figure 1: Enabling permission change auditing - Navigate to “Settings” → “Site Settings” → “Site Collection Administration” → “Site Collections” features → Activate “Reporting”. This step is required only when “Reporting” has not been activated earlier. This step is required if “Reporting” has not been activated earlier. If you have already activated reporting, you can skip this step.

Figure 2: Activating reporting
To find out whether reporting has been enabled or not, go to “Site Collection Administration” and check whether the “Audit log reports” is visible or not.
Step 2- View the Permission Changes Report
Perform the following steps:
- Go to “Settings” → “Site settings” → “Site Collection Administration” → “Audit Log Reports”
- “View Auditing Reports” page appears. In our case, since we want to see permission changes report, you will have to click “Security Settings”

- Click “Browse” button to the folder where you want to save the report and click “OK”
- The “Operation Completed Successfully” page appears, click “click here to view the report” link to save the report on the disk.

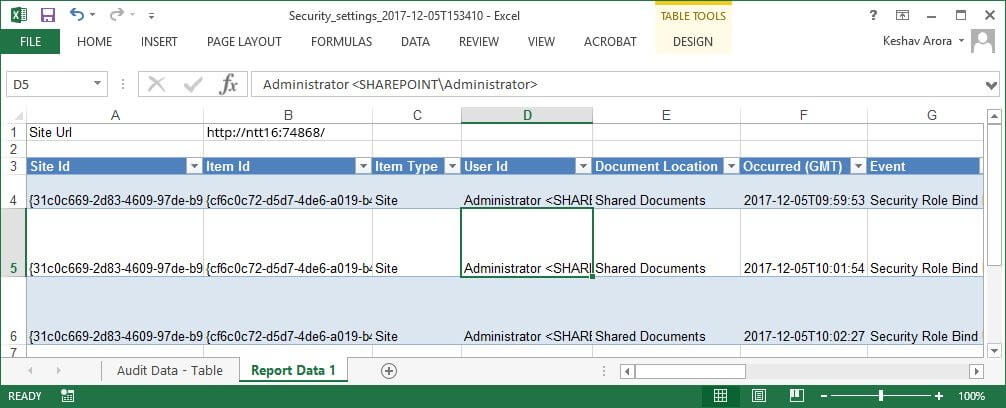
Figure 4: Report saved on local disk - The following screenshot shows the native permission change report opened in Microsoft Excel.

Figure 5: Permission change report
Issues with Native Auditing for SharePoint 2013
The following are the drawbacks of the native auditing.
- Keeping track of the configuration and content can be complicated.
- Lacks the facility to store data from multiple SharePoint Servers in one centralized and secure database.
- Predefined reports lack flexibility as it is difficult to search changes based on object path, users and resource. Filtering and sorting the reports is also not easy.
Audit Permission Changes with Lepide SharePoint Auditor
SharePoint is an incredibly useful and powerful solution, but in large organizations keeping up with permission changes can be a little difficult and time-consuming. Lepide SharePoint Auditor generates real-time reports for all configuration changes made to SharePoint. You can audit both SharePoint on-premises and online through one console and store audit data in one centralized and secure database.
Following is a screenshot of “Permission Modified” report that shows the permission changes made in SharePoint Server.
