Real time alerts are an essential tool to enable organizations to instantly detect and respond to potential attacks. Without real-time alert mechanisms in place for all significant security changes, inappropriate access to network resources may not be detected soon enough to stop an attack. The longer a malicious activity goes unnoticed, the greater the potential impact on the organization. However, once an alert has been triggered, immediate action can be taken to reduce risk and mitigate damage.
In this article we will look at two ways to set up alerts. First by using the native method of Microsoft Purview and then using Lepide Auditor which provides a more straightforward method.
Setup Alert using Compliance Manager
The first step when using the compliance manager is to set up an alert policy.
What is an Alert Policy?
An alert policy consists of a set of rules and conditions that define the user or admin activity that generates an alert, a list of users who trigger the alert if they perform the activity, and a threshold that defines how many times the activity has to occur before an alert is triggered. The policy is also categorized and assigned a severity level. These two settings help you manage alert policies (and the alerts that are triggered when the policy conditions are matched) because you can filter on these settings when managing policies and viewing alerts in the Microsoft Purview compliance portal. For example, you can view alerts that match the conditions from the same category or view alerts with the same severity level.
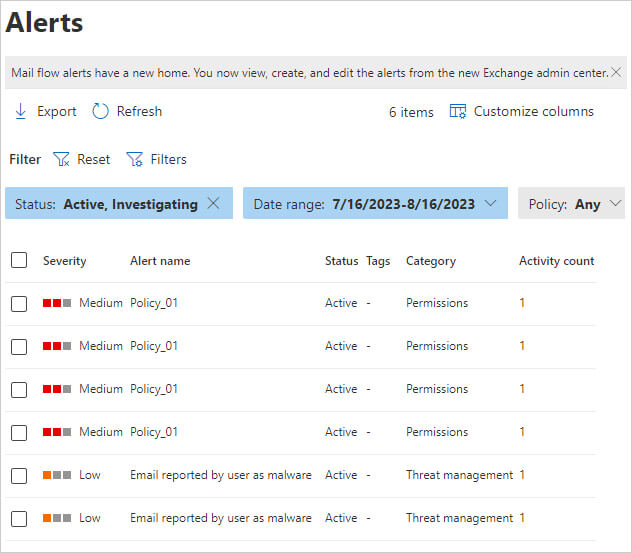
You can use alert policies and the alert dashboard in the Microsoft Purview compliance portal or the Microsoft 365 Defender portal to create alert policies and then view the alerts generated when users perform activities that match the conditions of an alert policy. There are several default alert policies that help you monitor activities such as assigning admin privileges in Exchange Online, malware attacks, phishing campaigns, and unusual levels of file deletions and external sharing.
How to Create an Alert Policy
To create a policy to generate alerts based on one or more events, follow the steps below:
- In Compliance Manager, go to the Alert policies page and select +Add to start the policy creation wizard.
- On the Name and description page, enter a name for the policy and an optional description, then select Next.
- On the Conditions page, select one or more events that will trigger an alert. Under the Improvement action activity header, select Add sub-conditions and check the box that appears when hovering to the left of each condition name. You can choose one or more conditions for a policy: assignment change, evidence change, and implementation status change, score change, test status change. When you’re finished, select next.
- On the Outcomes page, choose what happens when a policy match is detected:
- Select a severity level for the alert when a match is detected: low, medium, or high.
- Select how often you want to be notified by email when a match is detected. You can choose to be notified with each match or choose a threshold of a certain number of matches above three.
- If you choose to be notified after three or more matches, you’ll then designate the number of minutes within which that threshold must be reached (for example, 4 matches within 90 minutes).
- On the Alert recipient page, select additional users in your organization to receive an email when the policy conditions are met. The user who creates the policy is the default recipient. Select +Select recipients and check the boxes next to each username on the flyout pane whom you want to receive the email notification. When done, select Add recipients, then select Next.
- Review all selections and make any changes to each section by selecting it, then select Next. When finished reviewing, select Create policy.
- When your policy is created, select Done. You’ll arrive at your Alert policies page with the flyout pane for the policy you just created already open.

When done, select Next.
Your policy is active once you create it, which means it will start detecting matches and generating alerts. See the Managing policies section below for how to inactivate or delete policies.
It can take up to 24 hours after creating or updating a policy before alerts are generated by that policy. See View alert details below to learn about triggering events and alert aggregation.
Using Lepide Auditor to Configure an Alert
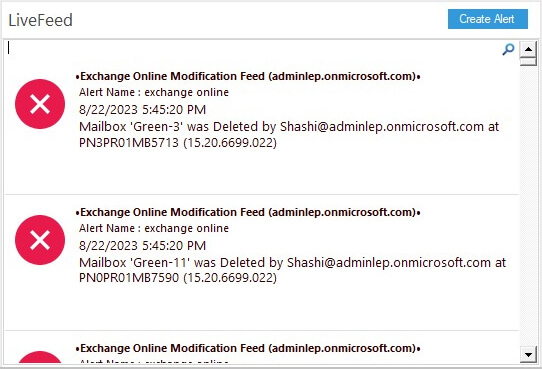
Using Lepide Auditor for Exchange, you can create real-time alerts which administrators, or selected recipients, can then receive as email notifications, LiveFeed updates and as push-notifications on the Lepide mobile application.
Alerts can be generated based on several factors. These could be:
- a single event
- pre-defined criteria (such as time and date)
- threshold-based criteria
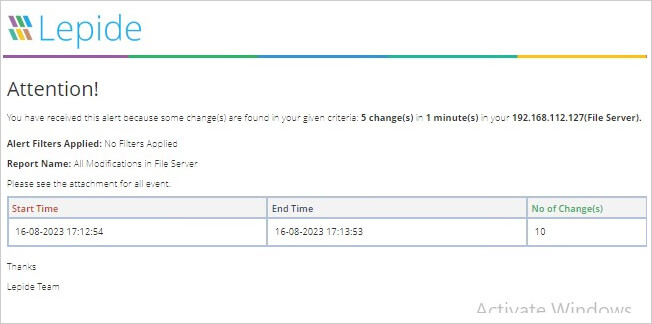
Below are examples of a Threshold Alert on the Lepide Dashboard and an Email alert:
Alerts can be configured to execute a customized script whenever a selected change is detected. Scripts can be of the following types:
- VB Script
- PowerShell Script
- Batch File
Using custom script execution, you can shut down users, servers and take other actions to mitigate the effects of a security breach.
Alerts are easy to setup as follows:
- Right click on the report that you want to set an alert for
- Choose Set Alert
- Work through the Wizard to specify the options for the alert