Microsoft SharePoint is an excellent collaboration tool, enabling people to share documents, manage projects, and work together from virtually anywhere. However, although this improves productivity, it also increases the risk of oversharing sensitive information. Permissions can become complex, for example, when users are added to groups. This can result in confidential data being accessible to people who no longer need it or who should never have had access in the first place.
In this article, we will look at why oversharing in SharePoint presents a security risk, and how to identify overshared sites using both native methods and other auditing solutions.
For SharePoint Server
Method 1: Review Site Permissions
This method helps identify who has access to a SharePoint site and whether permissions have been assigned too broadly.
Please follow the steps below:
- Open the SharePoint site you want to review
- Click the Settings (gear) icon
- Select Site Settings
- Under Users and Permissions, click Site Permissions
- Review the SharePoint groups listed, such as:
- Site Owners
- Site Members
- Site Visitors
- Open each group to review its members. Check for:
- Users who no longer require access
- Large groups that provide broad access
- Users with Full Control or Design permissions who may not need them
- Accounts that have been assigned permissions directly instead of through groups
Method 2: Review Permission Inheritance
Oversharing often occurs when sites or libraries stop inheriting permissions and administrators forget to review the unique permissions.
The steps to check this are as follows:
- Open the SharePoint site.
- Navigate to Settings, Site Settings, Site Permissions.
- Check whether the site displays “This site inherits permissions from its parent” or “This site has unique permissions”.
- If unique permissions exist, review every user and group with access. Repeat the process for:
- Document libraries
- Lists
- Folders (where applicable)
- Individual documents with unique permissions (where applicable)
- Verify that each unique permission assignment is still required.
Method 3: Review SharePoint Groups
SharePoint groups are commonly used to manage permissions. Reviewing their membership can reveal excessive access.
The steps to check this are as follows:
- Open the SharePoint site.
- Go to Settings, Site Settings, People and Groups.
- Select each SharePoint group, including:
- Owners
- Members
- Visitors
- Custom groups
- Review the users assigned to each group. Look for:
- Former employees
- Contractors
- Temporary users
- Unexpected members
- Groups containing an unusually large number of users
Method 4: Review Active Directory Security Groups
Many SharePoint Server environments assign permissions to Active Directory groups rather than individual users.
The steps to check this are as follows:
- Identify any Active Directory security groups listed under Site Permissions.
- Open Active Directory Users and Computers.
- Locate the security group.
- Review the group’s membership.
- Check for:
- Inactive accounts
- Nested security groups
- Users who no longer need access
- Remove unnecessary members where appropriate.
Method 5: Use PowerShell
PowerShell allows administrators to review permissions across multiple sites more efficiently.
The steps to check this are as follows:
- Open the SharePoint Management Shell as an administrator.
- Connect to the SharePoint farm.
- Run PowerShell commands to enumerate:
- Site collections
- Sites
- Users
- Permission assignments
- Sites, libraries, folders, and files with unique permissions
- Export the results to CSV if required.
- Review the report for:
- Sites with excessive permissions
- Direct user permissions
- Large security groups
- Users with Full Control
For SharePoint Online
Method 1: Review Site Permissions
This is the quickest way to identify who currently has access to a SharePoint Online site.
The steps to check this are as follows:
- Open the SharePoint site.
- Click the Settings (gear) icon.
- Select Site permissions.
- Review:
- Site Owners
- Site Members
- Site Visitors
- Select Advanced permissions settings (if available) for additional details.
- Check for:
- Users with direct permissions
- Large Microsoft 365 groups
- External users and guest accounts
- Users who no longer require access
Method 2: Review External Sharing Settings
External sharing is one of the most common sources of oversharing in SharePoint Online.
The steps to check this are as follows:
- Sign in to the SharePoint Admin Center
- Select Sites, Active sites
- Choose the site you want to review.
- Open the Policies tab
- Review the site’s External sharing setting.
- Determine whether the site allows:
- Anyone links
- New and existing guests
- Existing guests only
- Internal users only
- Compare the site’s sharing configuration with your organization’s sharing policy.
Method 3: Review Site Access in the SharePoint Admin Center
The SharePoint Admin Center provides a centralized view of site ownership and sharing settings.
The steps to check this are as follows:
- Open the SharePoint Admin Center
- Go to Sites, Active sites
- Select a site
- Review:
- Site owners
- Site administrators
- Connected Microsoft 365 Group
- Site sharing settings
- Verify that ownership and administrative access are appropriate.
Method 4: Review Microsoft Purview Audit Logs
Audit logs help identify recent sharing activities and permission changes that may have resulted in oversharing.
The steps to check this are as follows:
- Sign in to the Microsoft Purview portal
- Navigate to Solutions, Audit
- Create a new audit search
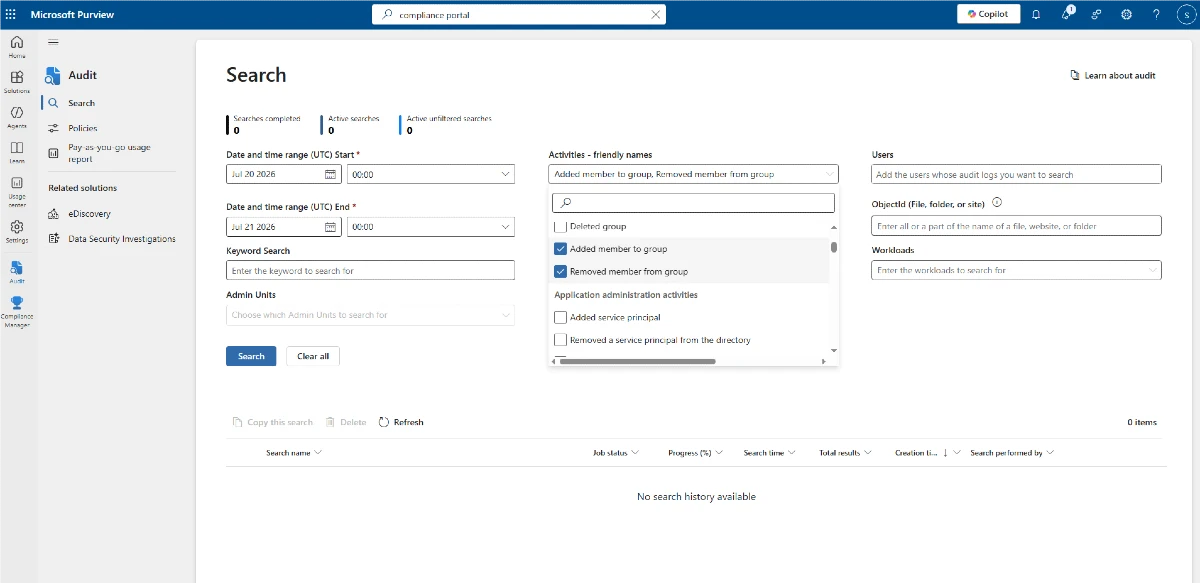
- Select activities related to SharePoint sharing, such as:
- Shared file
- Shared folder
- Sharing link created
- Sharing settings changed
- Specify the desired date range and users (optional)
- Run the search
Review the results for unexpected sharing events or permission changes that may require investigation. Note that Microsoft Purview Audit records sharing and permission change events but does not provide a complete inventory of current site permissions, so it should be used alongside permission reviews.
These methods provide a practical workflow for identifying potentially overshared SharePoint sites using native capabilities in both SharePoint Server and SharePoint Online. However, because permissions, inheritance, sharing settings, and audit logs must be reviewed separately, identifying overshared sites across large environments can be time-consuming.
How Lepide Helps
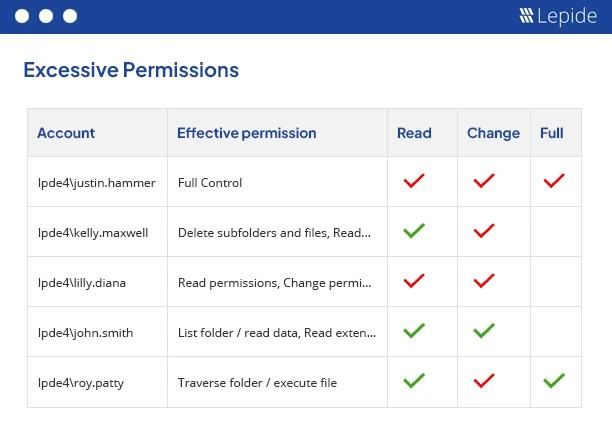
A more efficient way to identify overshared SharePoint sites is to use the Lepide Data Security Platform. Lepide provides a centralized view of SharePoint permissions, enabling you to see who has access to sites, files, and folders, identify users with excessive permissions and uncover overexposed data that may increase security risk. AI-powered permissions analysis helps detect unnecessary or elevated access, making it easier to enforce least privilege and reduce the risk of unauthorized data exposure.
The screenshots below show examples of Lepide’s predefined permissions reports, which help administrators review SharePoint permissions and identify excessive access. These reports are generated from Lepide Trust. Simply select a date range and click Generate Report to produce the reports.