Knowing how to locate, discover, and then classify files containing sensitive data is a critical part of adding context to your security, governance, and data protection initiatives.
Being aware of where sensitive data is located will help you determine whether you are applying the correct access controls, security solutions, and protection initiatives on the data that matters most to the continuity and success of your business.
The first step is to find out exactly where all your important data resides and classify it according to its sensitivity and value.
While Microsoft 365 offers some data classification functionality, it does have multiple drawbacks which include:
- It is limited to Microsoft 365, which can be a problem as most organizations have hybrid IT environments.
- There is no proper search functionality.
- It can be hard to configure and maintain and has significant processing delay.
- It can give false positives, resulting in significant time and effort to investigate.
The Lepide Data Security Platform overcomes these limitations by allowing you to easily locate and classify sensitive data through its inbuilt data classification engine. The Solution locates sensitive data and classifies it at the point of creation/modification in real-time to enable immediate threat detection and fast response times. Data can also be classified based on the risk and monetary value associated with it.
Explained below are two methods for identifying sensitive data in MS Teams and SharePoint online.
- Using Microsoft 365 Compliance Center
- Using the Lepide Data Security Platform
Using Microsoft 365 Compliance Center
The Microsoft 365 platform includes a set of predefined sensitive data types that cover many common requirements. To see them, open the Microsoft 365 compliance center:
https://protection.office.com/sensitiveTypes and then go to Classification, Sensitive info types.
Adding a Custom Data Type
The built-in data types cannot be modified, but you can create new ones from scratch:
- Click Create sensitive info type
- Enter a unique Name and a Description for your custom data type
- Click Next
- Click Create pattern to create a pattern for your sensitive info type
- Click Next
- Choose the recommended confidence level to show in compliance policies
- Click Next
- Review settings and click Create to finish
To test your new data type:
- Click on the data type in the list
- From the icons at the top choose Test
- Upload a file
- Click Test
- When the analysis is finished, review all the matches for the data type
Reviewing your sensitive data
Prerequisites
The account that accesses and uses data classification must have one of the following types of licenses:
- Microsoft 365 (E5)
- Office 365 (E5)
- Advanced Compliance (E5) add-on
- Advanced Threat Intelligence (E5) add-on
To see which data has been classified, you need to use Content Explorer. Access to Content Explorer is restricted because it lets you read the contents of scanned files; by default, even the Global Administrator does not have access to Content Explorer. To review classification results, a user must have the following permissions:
Content Explorer List viewer — Enables the user to see each item and its location in list view.
Content Explorer Content viewer — Enables the user to view the contents of each item in the list.
To assign these permissions to use Content Explorer:
-
- Open the Microsoft 365 security and compliance center (https://protection.office.com)
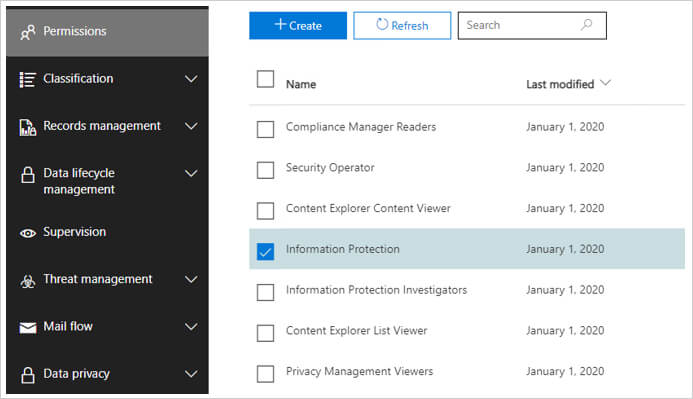
- Click Permissions, select the required permission type, click Edit role group in the Information Protection window
- Click Choose Members, click Add, locate and tick the required usernames, click Add, click Done
Please note that these permissions override permissions that are locally assigned to the items, which allows viewing of the content even if the user doesn’t have access to their locations.
How to Review Classification Results
-
- Open the Microsoft 365 compliance center (https://compliance.microsoft.com/dataclassification).
- Go to Data Classification, Content Explorer
- On the left, you will see each data type found in your Microsoft 365 with its object count; on the right – the locations of that data (Exchange/SharePoint/OneDrive address). Pick a data type of interest (such as Credit Card Numbers) and then drill down into a particular location to see the classified files there.
- Click on any file to review its details and content (if you have appropriate rights).

Using the Lepide Data Security Platform
As you can see, this native way to identify sensitive data in Teams and SharePoint online is both time-consuming and complex. A more straightforward solution to this is to use the Lepide Data Security Platform.
The Lepide Data Security Platform overcomes the complexity of the native method by providing a straightforward way to identify all sensitive data in Teams and SharePoint online by setting up Data Classification and using the Classified SharePoint Objects Report:
Configuring Data Classification in the Lepide Data Security Platform
- From the Data Discovery & Classification tab, add the Centralized Communication Server Details.
- Install the Agent on the server from where you want to run Classification.
- Create a Profile to specify the Classification Templates containing the tags and patterns
- Enter the credentials to access the shared folders. Add the shared folders to be scanned
- Assign a template to the Profile which you have selected.
- The next step is to create the patterns within the tags
- Select the file types which you want to scan for the Data Classification.
- Set the classification Method and specify the Classification Server
Running the Sensitive Data Report
From Permissions & Privileges, select Sensitive Data, Classified SharePoint Objects
-
- Click Generate Report
- The report will run listing all sensitive SharePoint data.
- The report can be filtered to refine results and can be saved and exported.

In conclusion, you can see that the Lepide Data Security Platform provides a straightforward way to identify sensitive data in Teams and SharePoint Online resulting in a comprehensive yet clear-to-understand report.