Microsoft Teams and SharePoint Online provide many communication and collaboration tools in one place, and with so many more people now working remotely, this functionality is essential for them to do their jobs effectively. Depending on your organization’s sharing policies, users may be able to invite both internal and external users to Microsoft Teams or SharePoint Online sites using their email addresses.
While this flexibility has the advantage of making working as a team from anywhere easy and efficient, it also means that the potential for malicious behavior is increased. It is therefore essential to closely monitor who gets access to your environment and to be able to quickly spot any escalation of permissions.
In Microsoft Teams, privilege escalation most commonly occurs when a user is promoted from a Team member to a Team owner. In SharePoint Online, it typically involves adding users to privileged SharePoint groups, granting Full Control permissions, assigning Site Collection Administrator rights, or breaking permission inheritance to grant unique permissions. Monitoring these changes helps organizations quickly identify unauthorized access and reduce the risk of insider threats or compromised accounts.
Why Tracking Privilege Escalation Matters
Undetected privilege escalation poses significant security risks to your organization. External users granted Owner or Full Control permissions can view, modify, delete, or further share sensitive data depending on the permissions assigned. Internal privilege escalation may indicate account compromise, insider threats, or malicious intent. By proactively monitoring these changes, you can identify unauthorized access before it leads to data breaches or compliance violations.
Key Indicators of Privilege Escalation
Monitor your environment for these specific events that signal potential privilege escalation:
- User added to [SiteName] Owners group
- Full Control permissions granted directly to a user
- Changes to group membership with elevated rights
- External users receiving edit or owner-level access
- Bulk permission changes across multiple sites
- A user is assigned as a SharePoint Site Collection Administrator
- Permission inheritance is broken and unique permissions are assigned to a site, library, or folder
- A Microsoft Teams member is promoted to a Team owner
Prerequisites
Before performing privilege escalation audits, ensure you have the following:
- The “Audit Logs” or “View-Only Audit Logs” role assigned to your account
- Access to Microsoft Purview Audit
- Appropriate administrative permissions for SharePoint Online or Microsoft Teams
Microsoft provides native auditing capabilities through the Microsoft 365 Unified Audit Log. While these tools record permission changes, sharing events, and group membership modifications, investigating privilege escalation often requires manual filtering, reviewing multiple audit records, or exporting the results for further analysis. To review the details, you must either drill down into each event separately or download the data into a CSV file and analyze it there.
A solution to this time-consuming and complex process is to use the Lepide Auditor. With the Lepide Auditor, you can generate the All Modifications in SharePoint Online Report showing you SharePoint Online privilege escalations within a specified date range.
Here are two ways to audit privilege escalation in MS Teams and SharePoint online and they are described below.
- Using the Native Method
- Using the Lepide Auditor
Using the Native Way for Auditing Privilege Escalation
Please follow the below steps:
- Open the Microsoft Purview portal and navigate to Audit.
- Navigate to Audit > Search.
- From the Activities filter, select the audit activities related to sharing, group membership, ownership, or permission management that correspond to the privilege escalation events you want to investigate.
- Click Search
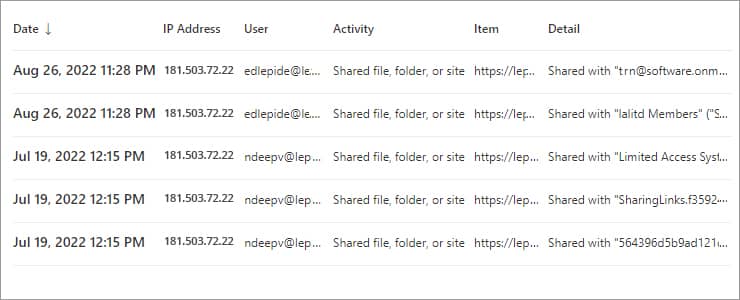
The search results may include permission grants, sharing events, group membership changes, ownership changes, and other audited activities depending on the filters selected. The output table will include the following details:
- User — The name of the user who performed the action.
- Item — The SharePoint site, document, or Microsoft Teams-related resource where the activity occurred.
- Detail — The user or group to which the change was applied.
If you want to see whether privilege escalation took place, you will have to look further into the results.
This can be done by clicking the specific event and looking through the Details tab. Depending on the activity, you will need to search for the following information:
-
- If a user was added to a group with Full Control permissions:
The AuditData (including the EventData section) will show the name of the group to which the user was added.
By default, the SharePoint Owners group is assigned Full Control permissions for a SharePoint site. Microsoft Teams owners are managed separately but are typically synchronized with the associated Microsoft 365 Group ownership.
-
- If rights were granted to a user directly:
The AuditData (or EventData) field will display the permissions granted. Pay particular attention to users who are granted Full Control, assigned to Owners groups, or promoted to Team owners.
The Audit Log Search filter capabilities are quite simple and don’t enable you to exclude irrelevant results, so using this method means that you must click through each event individually. An alternative way to find privilege escalation is to export the data to a CSV file and parse the data in Excel as follows:
- To export results to a CSV file, click Export Results, Download all results
- In a new workbook, select the Data Tab, and from the Get & Transform Data section, click Get Data, From File, From Text/CSV and select the CSV file that you previously downloaded. Click Import, Transform Data.
- In the Power Query Editor, right-click the title in the AuditData column. select Transform, choose JSON
- In the upper right corner of the AuditData column, click the Expand icon, deselect the properties that you don’t want to include, click OK.
The following properties are examples of those available to be included in the query:
- AuditData.CreationTime — The event timestamp
- AuditData.ClientIP — The IP address from which the event was performed
- AuditData.UserId — The name of the user who performed the action
- AuditData.EventData — The action performed
- AuditData.SiteUrl — The URL of the SharePoint site or Team where the change was made
- AuditData.TargetUserOrGroupName — The user or group to which the change was applied
Privilege Escalation Auditing Using the Lepide Auditor
Although the native auditing capabilities provide the necessary audit events, investigating privilege escalation in Microsoft Teams and SharePoint Online can be time-consuming because it often requires manually reviewing and correlating multiple audit records. A more straightforward solution to this is to use the All Modifications in SharePoint Online Report from the Office 365 Auditing component of Lepide Auditor:
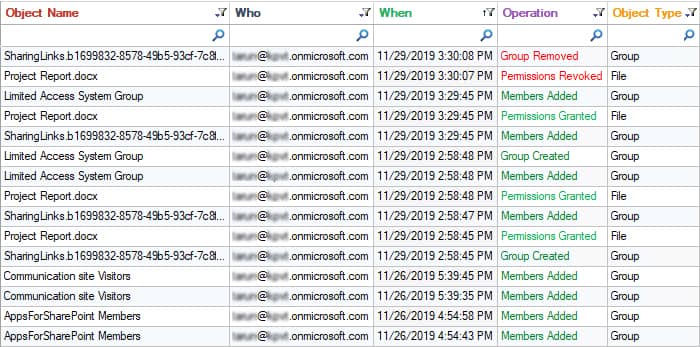
- Click the User & Entity Behavior Analytics icon and select SharePoint Online Modification Reports, All Modifications in SharePoint Online
- Select a Date Range, select the filters you require and click Generate Report
- To see further detail about a specific object, click Details and the Details Window will be displayed
- The report can be sorted, filtered, grouped, saved, and exported
NOTE– Similar process you can follow to generate a report for MS Teams.
Native Method vs. Lepide Auditor Comparison
Frequently Asked Questions
Privilege escalation in Microsoft Teams and SharePoint Online occurs when a user receives permissions beyond their intended level. Examples include being promoted to a Team owner, added to a privileged SharePoint group, assigned as a Site Collection Administrator, or granted Full Control permissions directly.
Organizations should continuously monitor privilege changes where possible. If continuous monitoring is not available, review audit logs at least weekly for high-security environments and monthly for lower-risk environments. Critical systems should implement near real-time monitoring wherever feasible.
Full Control permissions allow users to modify site settings, delete content, and grant access to others. Unauthorized Full Control access can lead to data breaches, accidental deletions, or malicious data exfiltration.