In today’s interconnected world, where data is the lifeblood of organizations, safeguarding sensitive information is of paramount importance. Ensuring that the right individuals have access to the right resources, while protecting them from unauthorized access, is a critical aspect of permissions management and overall data security. This is where Group Policy comes into play, offering a powerful and efficient solution for managing permissions for files and folders within a networked environment.
Group Policy is a feature in Microsoft Windows that allows administrators to define and enforce security settings, configurations, and restrictions across a network. With Group Policy, administrators can centralize and streamline the process of assigning permissions to files and folders, ensuring consistency and minimizing security vulnerabilities.
Assigning permissions through Group Policy offers several advantages. Firstly, it enables administrators to set permissions based on user roles or groups, rather than individually assigning permissions to each user. This simplifies the management process and reduces the chances of errors or omissions. Secondly, Group Policy allows for the efficient propagation of permission changes across multiple systems, ensuring uniform access control throughout the network. This not only saves time but also enhances security by minimizing the risk of misconfigurations.
In this article, we will explore the step-by-step process of assigning permissions to files and folders through Group Policy. Additionally, we will also go through how you might use Lepide Auditor to audit permission changes and to analyze NTFS permissions so that you can maintain appropriate access control.
Steps to Set Files and Folders Permissions using GPO
- Go to “Start Menu” -> “Administrative Tools”, and click “Group Policy Management” to access its console.
- In left panel of “Group Policy Management Console”, you have to create a new Group Policy Object or edit an existing Group Policy Object.
- To create a new GPO, right click “Group Policy Objects”, and select “New” from the context menu. It shows “New GPO” window.
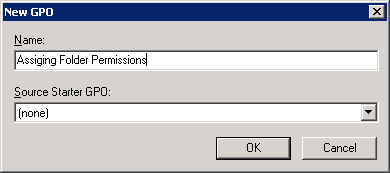
Figure 1: Creating a new GPO - Enter a name for the Group Policy Object (GPO) (in this case it is Assigning Folder Permissions), leave “Source Starter GPO” as “(none)”.
- Right-click on the newly created “User Folder Permissions” GPO, and select “Edit GPO”. Group Policy Management Editor window appears on the screen
- Navigate to “Computer Configuration” -> “Policies” -> “Windows Settings” -> “Security Settings” -> “File System”
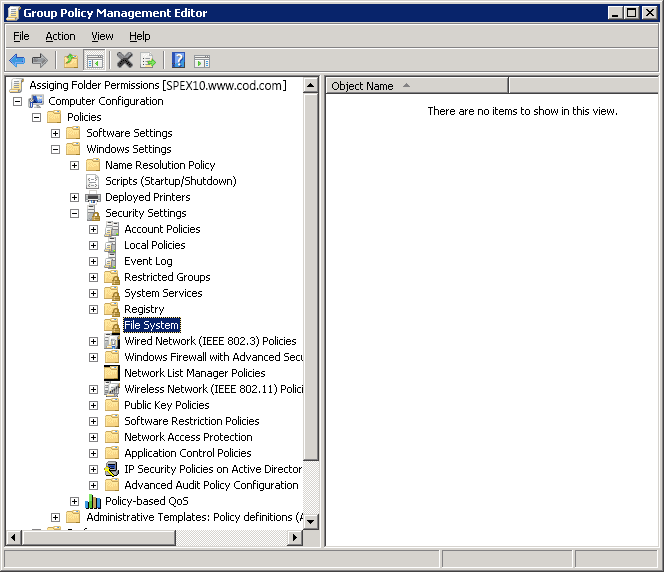
Figure 2: Navigate to File System - Right-click on “File System” in the left pane and select “Add File…” It shows the following dialog box.
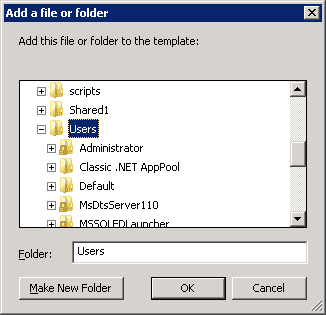
Figure 3: Select file or folder which you want to assign permissions on - Browse the folder or file that you wish to assign permissions on, and left click to select it. Click “OK”.
- “Database Security” window appears on the screen
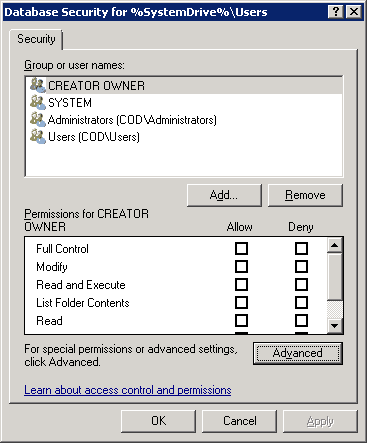
Figure 4: Database security window - Click “Advanced” button to access “Advanced Security Settings” window. Stay on the “Permissions” tab that appears by default.
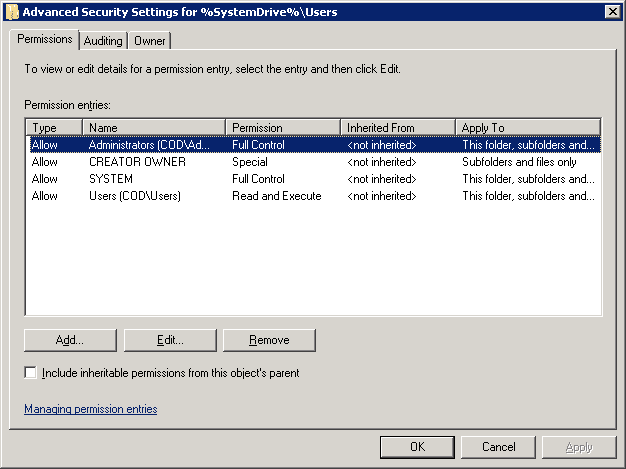
Figure 5: Advanced security settings window - On this tab, either select an existing user and click “Edit…” or click “Add…” to add a new user to the permissions.
- “Permissions Entry for…” dialog box opens up. Here, you will see that there is a list of permissions available for your users, and you can also choose where you want to apply those permissions.
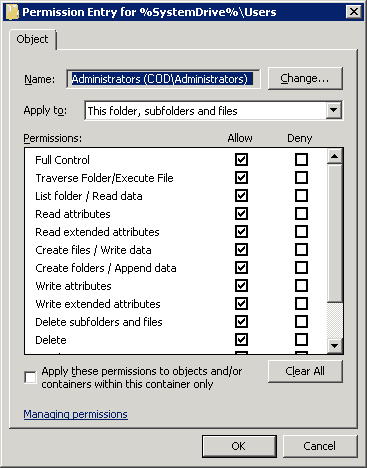
Figure 6: Permissions entry folders - Use the drop-down menu in the “Apply to” field to assign selected permissions to desired folders.
- Check the permissions as needed. These are self-explanatory.
- Click “OK” to apply the permissions. It takes you back to “Advanced Security” window.
- Now, move to the “Auditing” tab. Under this tab, you can do audit settings for the folder, so that any change done to this folder or its permission will be audited. Configure the auditing settings as per requirement.
- Similarly, you can do ownership settings for the folder under “Owner” tab.
- Once you have done “Permission”, “Auditing” and “Ownership” settings, click “OK” to close “Advanced Security…” window.
- Click “OK” to close “Database Security…” window. Next, you will see “Add Object” window.
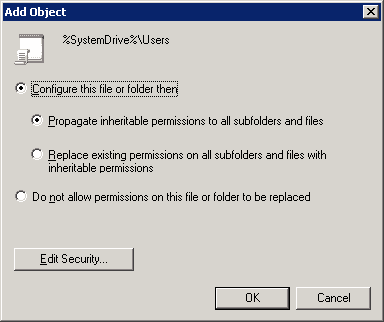
Figure 7: Add object window - There are following options on the “Add Object” window:
- Configure this file or folder then: Select this option to apply the settings. It contains the following two options.
- Propagate inheritable permissions to all subfolders and files: Selecting this option means, all the subfolders and files will inherit permissions from the parent folder. In case of a mismatch or conflict, explicit permissions that were assigned to the subfolders or files will override the inherited permissions.
- Replace existing permissions on all subfolders and files with inheritable permissions: This option will overwrite all the settings on all subfolders and files with the ones on the parent, so ultimately they will have identical permissions to the parent folder.
- Do not allow permissions on this file or folder to be replaced: Use this setting for subfolders and files that you do not want to inherit permissions. For this, make an additional entry for those subfolders and files that will not inherit permissions e.g. let’s say you want the “A” folder to inherit permission but don’t want “B” folder to inherit permissions, in that case create an entry for the “B” folder.
NOTE: In this case, option “a” has been selected. Click “OK” to close the “Add Object” window.
- Configure this file or folder then: Select this option to apply the settings. It contains the following two options.
- Close “Group Policy Management Editor” window.
- Right-click the domain you want to apply this GPO to, and then select “Link an Existing GPO…” option from the context menu. “Select GPO” window opens up.
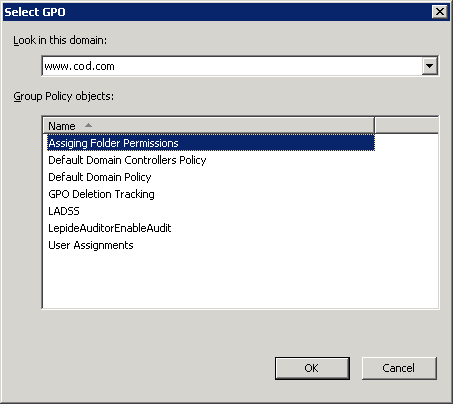
Figure 8: Select the new GPO - Select the new “Assigning Folder Permissions” GPO, then click OK.
- In the right pane, stay on the “Linked Group Policy Objects” tab that appears by default.
- Right-click on the “Assigning Folder Permissions”, and select “Enforced” from the context menu. A confirmation message appears on the screen.
- Click “OK” to close the dialog box.
How to Analyze File and Folder Permissions Using Lepide File Server Auditor
With the Lepide File Server Auditor, you can analyze NTFS’ permissions, track permissions changes and manage them.
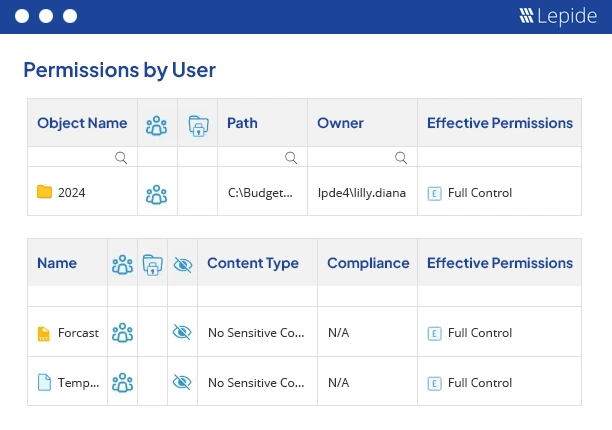
To analyze current effective permissions using Lepide File Server Auditor, you can run the Permissions by Object Report and select the Permissions by User tab. This report shows the Account name and the Effective Permissions assigned to that account for the selected object. The icons show the individual permissions for each user including list folder/read data, create files/write data and create folders/append data.
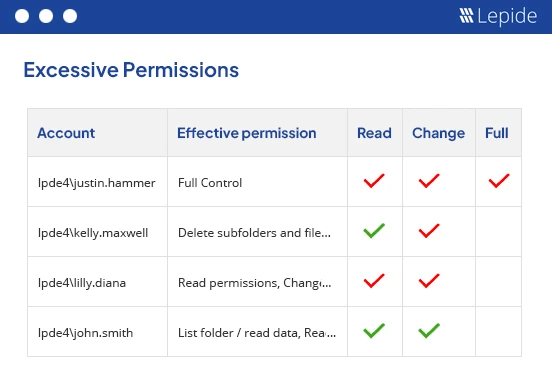
The Excessive Permissions by Object report, included as part of Lepide File Server Auditor, allows you to change user permissions to align with the Principle of Least Privilege. Following this principle, gives the bare minimum level of permissions to a user that they need to do their job. This will ensure that sensitive data is protected from unauthorized access and security breaches are mitigated.
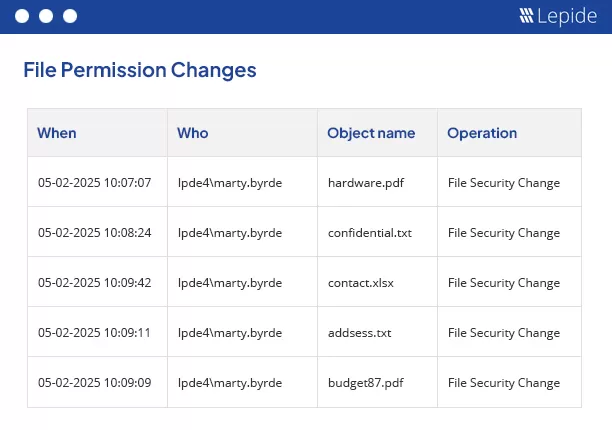
To track file server permission changes, you can run the All Permission Modifications report from the Lepide Solution. This gives you visibility over all file server permission changes within a specified time period. The information shown in this report includes when the change was made, who made the change, what was changed, the location of the changed object and what the change was. Having this information provides a straightforward way to track any unauthorized changes which should not have taken place.
Conclusion
In this article, you have seen the way to assign files and folders permissions through GPO. You have also seen the auditing of changes made to files and folders using Lepide File Server Auditor. The solution has pre-defined file and folders modification and permission modification reports that make enterprises safe and compliance-ready.