File auditing records access to and changes made to files stored on a Windows Server. When properly configured, it can help administrators determine who accessed, modified, deleted, or changed the permissions of a file.
Applies to: Windows Server 2016, Windows Server 2019, Windows Server 2022, and Windows Server 2025. The names or locations of some interface options may vary slightly between versions.
Enabling auditing for a specific file or folder involves two steps:
- Enable one of the following audit policies
- Audit File System through Advanced Audit Policy Configuration (the recommended method)
- Audit Object Access through Basic Audit Policy (the alternative method).
OR
- Configure an auditing entry on the specific file or folder through its Advanced Security Settings.
Both steps are required. Enabling the policy alone does not automatically audit every file or folder.
Prerequisites
Before proceeding, ensure that you have:
- Administrative privileges on the target file server
- Files or folders stored on an NTFS volume
- Access to the Group Policy Management Console
- Permission to create, edit, and link Group Policy Objects
- Access to Event Viewer on the target file server
For a file accessed through a network share, configure auditing on the Windows Server that stores the file, not on the client computer.
Audit Object Access versus Audit File System
Windows Server provides basic and advanced audit policies.
Audit File System provides more precise control and is recommended for new configurations. Audit Object Access remains supported and can be used as an alternative in environments that rely on basic audit policies.
Choose one method. Do not configure overlapping basic and advanced audit policies because this can produce unexpected audit results.
Step 1: Enable an audit policy
First, enable auditing at the system level. Choose one of the following methods. Audit File System is recommended for new configurations, while Audit Object Access is an alternative for environments that use Basic Audit Policy. Do not enable both methods.
Method 1: Enable Audit File System using Advanced Audit Policy
- Open Server Manager and select Tools -> Group Policy Management. Alternatively, run gpmc.msc
- Expand Forest -> Domains -> your domain.
- Locate the organizational unit containing the target file servers.
- Right-click the OU and select Create a GPO in this domain, and Link it here.
- Enter a name for the GPO, such as File Server Auditing Policy, and select OK.
- Right-click the new GPO and select Edit.
- Navigate to: Computer Configuration – Policies – Windows Settings – Security Settings – Advanced Audit Policy Configuration – Audit Policies – Object Access
- Double-click Audit File System.
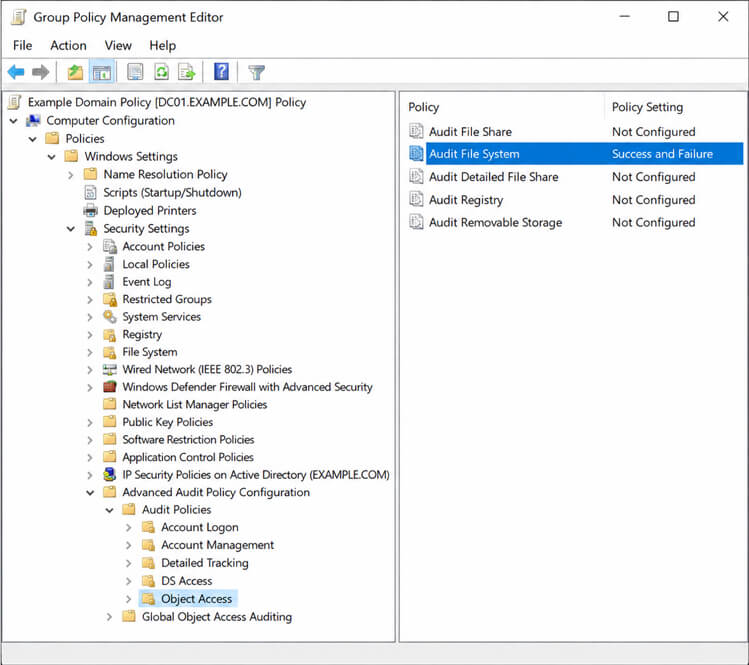
- Select Configure the following audit events.
- Select Success, Failure, or both:
- Success records permitted operations.
- Failure records denied access attempts.
- Select Apply, and then select OK.
- On the target file server, wait for Group Policy to refresh or run the following command from an elevated Command Prompt:
gpupdate /force - Verify the effective policy:
auditpol /get /subcategory:”File System”
Method 2: Enable Audit Object Access using Basic Audit Policy
Use this method only as an alternative to Audit File System.
- Open Group Policy Management.
- Expand Forest – Domains – your domain.
- Locate the OU containing the target file servers.
- Right-click the OU and select Create a GPO in this domain, and Link it here.
- Enter a name for the GPO and select OK.
- Right-click the new GPO and select Edit.
- Navigate to: Computer Configuration – Policies – Windows Settings – Security Settings – Local Policies – Audit Policy
- Double-click Audit object access.
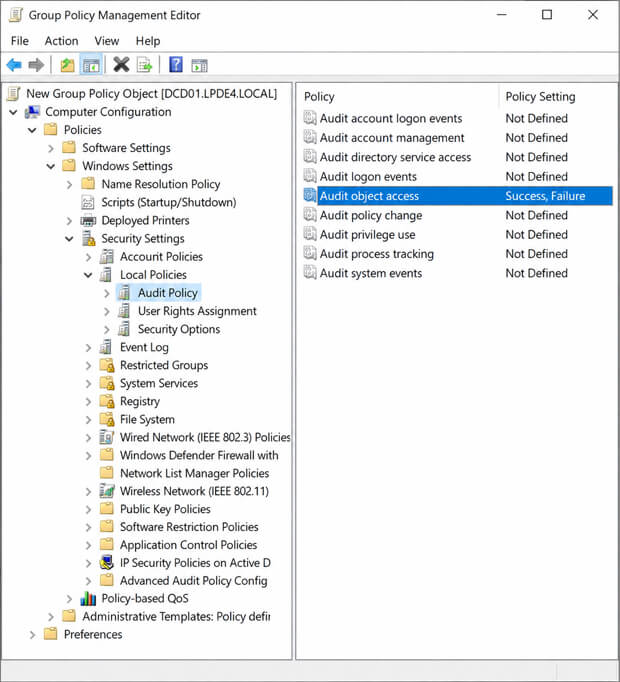
- Select Define these policy settings.
- Select Success, Failure, or both.
- Select Apply, and then select OK.
- On the target file server, wait for Group Policy to refresh or run:
gpupdate /force - Verify the effective policy:
auditpol /get /category:”Object Access”
Step 2: Configure auditing for a specific file or folder
Next, configure an auditing entry on each file or folder that you want to monitor. This entry defines the users, access types, permissions, and—in the case of a folder, the inheritance scope to audit.
Enable auditing for a specific file
-
- Right-click the file that you want to audit and select Properties.
- Open the Security tab and select Advanced.
- In Advanced Security Settings, open the Auditing tab.
- Select Add.
- Select Select a principal.
- Enter the user or security group whose access you want to monitor.
- Select Check Names, and then select OK.
Note: To monitor additional users, create separate auditing entries or select an appropriate security group. Use Everyone only when access by every user must be monitored. - From the Type list, select:
- Success for successful access
- Fail for unsuccessful access attempts
- Both for both types of access
- If Applies to is displayed, select This file only or This object only.
- Select the permissions that you want to audit, such as: Read data, Write data, Delete, Change permissions, Take ownership
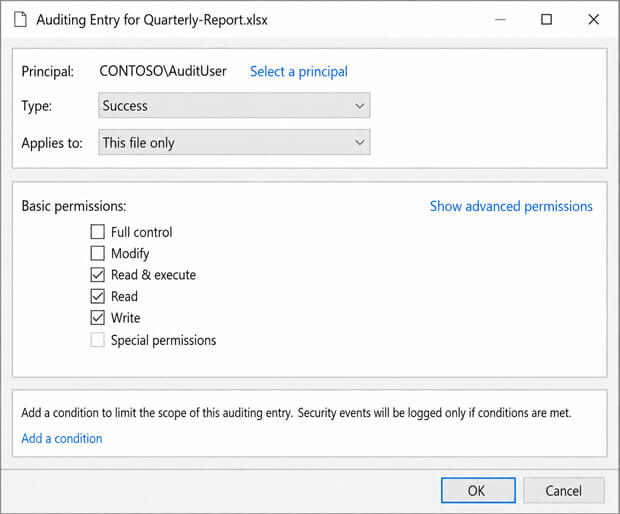
- Select OK to save the auditing entry.
- Select Apply, and then select OK to close Advanced Security Settings.
- Select OK to close the file’s Properties dialog box.
Note: Avoid selecting Full control, every permission, and both Success and Failure unless comprehensive auditing is required. Broad auditing can generate a large number of Security events.
Enable auditing for a folder
The same general steps can be used for a folder:
- Right-click the folder and select Properties.
- Navigate to Security – Advanced – Auditing.
- Add the required user or group.
- Select the access type and permissions to audit.
- Use Applies to to specify whether auditing covers:
- The selected folder only; or
- The selected folder, its subfolders, and its files.
Search File auditing events in Event Viewer
After configuring auditing, perform a monitored action and search for the resulting events on the file server.
- Open Event Viewer by running eventvwr.msc
- Navigate to: Windows Logs – Security
- In the Actions pane, select Filter Current Log.
- In the Event IDs field, enter: 4656 or 4658 or 4660 or 4663 or 4670
- Select OK.
- Open an event and review. The following image shows the logged event for a file access.
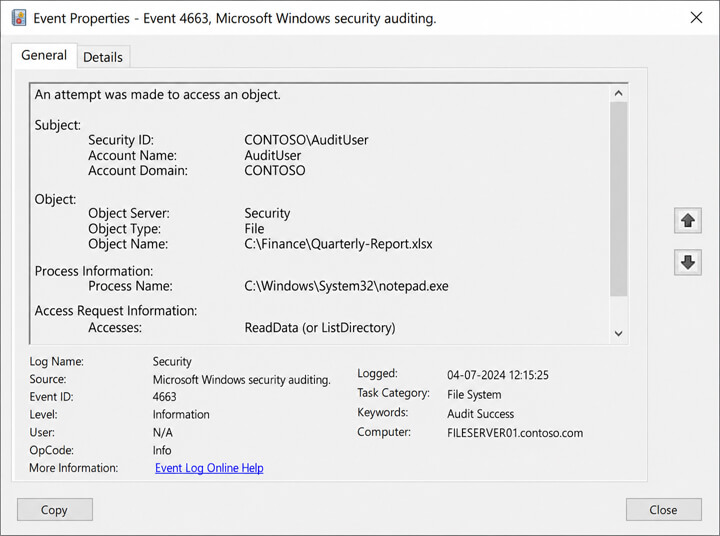
- Account Name: the user associated with the activity
- Object Type: confirm that the value is ‘File’
- Object Name: the file or folder path
- Process Name: the application that requested access
- Accesses: the access rights requested or used
- Handle ID: an identifier used to correlate related events
- To locate events for a particular file, select Find and enter the file name or part of its path.
Key Event IDs for File and Folder Auditing:
How Lepide Auditor helps with File and Folder Auditing
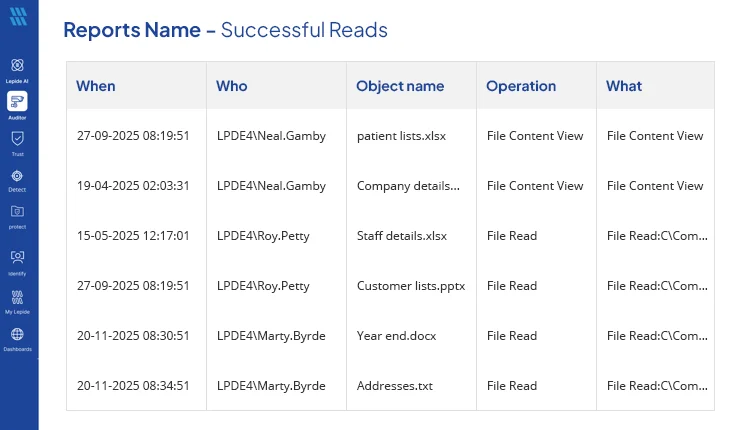
The Lepide File Server Auditor enables you to easily track any modifications being made to File Server, including files and folders themselves. You can track file copy events, file read attempts, file modifications, moves, creations, deletions and more with just the click of a button. You can also track whenever users attempt to read files (both successfully and failed attempts).
These reports take seconds to generate and provide all the critical file server auditing information that you need to detect potential threats or unwanted changes being made.
Native Auditing vs. Third-Party Solutions
Frequently Asked Questions
How long are audit logs retained by default?
Does enabling auditing impact server performance?
Can I audit multiple folders at once?
Why are my audit logs not appearing in Event Viewer?
Conclusion:
In this article, we have gone through the native process for configuring file and folder auditing. We have also shown you how much better our Lepide File Server Auditor is at doing the same job. Given the importance of security and compliance, it obvious that a specialized solution like Lepide’s File Server auditing software should be given preference over native auditing.