Windows File Server auditing is the process of tracking user activities on files and folders—including access, creation, modification, and deletion—to ensure data security and regulatory compliance. By monitoring these activities, organizations can detect unauthorized access, investigate security incidents, and meet audit requirements for standards like GDPR and HIPAA.
Key Steps to Monitor File and Folder Activities
- Configure the “Audit Object Access” policy via Group Policy Management/li>
- Enable auditing on specific files and folders through Advanced Security Settings
- Review security events in Windows Event Viewer using relevant Event IDs
- Consider third-party tools like Lepide File Server Auditor for simplified monitoring
There are many reasons why you may want to track file and folder activities on Windows File Servers; including data security and compliance. Knowing when users are accessing, reading, creating, modifying or deleting your files and folders is of paramount importance when it comes to ensuring the security and integrity of your File Servers. In this article, we will show you how to keep track of what’s happening to your files and folders using native processes, and also how using Lepide File Server Auditor can help to simplify the entire process.
Common Use Cases
Organizations implement file server auditing for various purposes:
- Compliance auditing: Meet regulatory requirements for GDPR, HIPAA, SOX, and PCI-DSS
- Insider threat detection: Identify unauthorized access or suspicious user behavior
- Forensic investigation: Trace file activities during security incident analysis
- Ransomware detection: Monitor for mass file modifications or deletions indicating an attack
- Access governance: Verify that permissions align with business requirements
Prerequisites
Before configuring file and folder auditing, ensure you have the following:
- Supported Windows Server versions: Windows Server 2016, 2019, or 2022
- Required permissions: Domain Administrator or equivalent privileges to modify Group Policy
- Tools needed: Group Policy Management Console (gpmc.msc), Windows Event Viewer
- Access requirements: Administrative access to the file server and target folders
Step 1: Configure the “Audit Object Access” audit policy
Perform the following steps to set up this audit policy:
- On the primary domain controller, or on a workstation where “Administration Tools” are installed, open “Run” dialog box, type “gpmc.msc”, and click “OK” to open the “Group Policy Management” console.
- In the “Group Policy Management” window, right-click on the default or a customized domain policy, and select “Edit” from the context menu to open the Group Policy Management Editor window.
Note: It is recommended to create a new GPO, link it to the domain and edit it.
- In “Group Policy Management Editor” window, navigate to “Computer Configuration” ➔ “Windows Settings” ➔ “Security Settings” ➔ “Local Policies” ➔ “Audit Policy”.
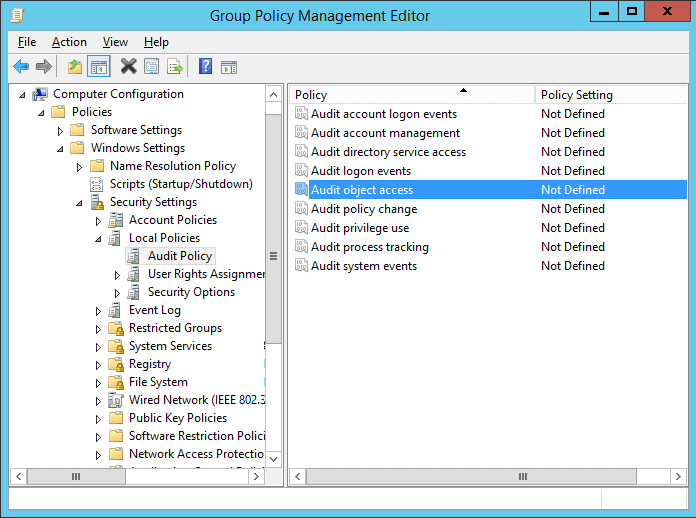
Figure 1: Properties of “Audit Object Access” policy - Double-click “Audit Object Access” to view its properties.
- Click “Define these policy settings” checkbox. Click “Success” and “Failure” check boxes.
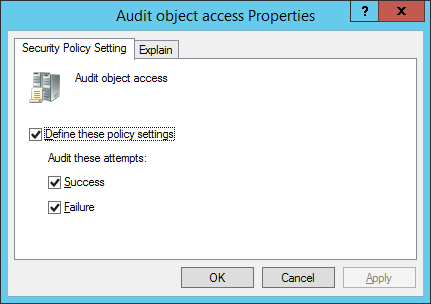
Figure 2: “Audit object access” policy
Step 2: Configure auditing on files and folders
Follow the below steps to enable auditing for the files and folders you want to audit on your Windows File Server.
- Open “Windows Explorer”, and navigate to the folder that you want to track.
- Right-click the folder and select “Properties” from the context menu. The folder’s properties window appears on the screen.
Note: If you want to track multiple folders, you will have to configure audit for every folder individually.
- Navigate to “Security” tab.

Figure 3: Security tab of “Work files” folder’s properties - Click “Advanced” to access “Advanced Security Settings”. In “Advanced Security Settings” window, navigate to “Auditing” tab.
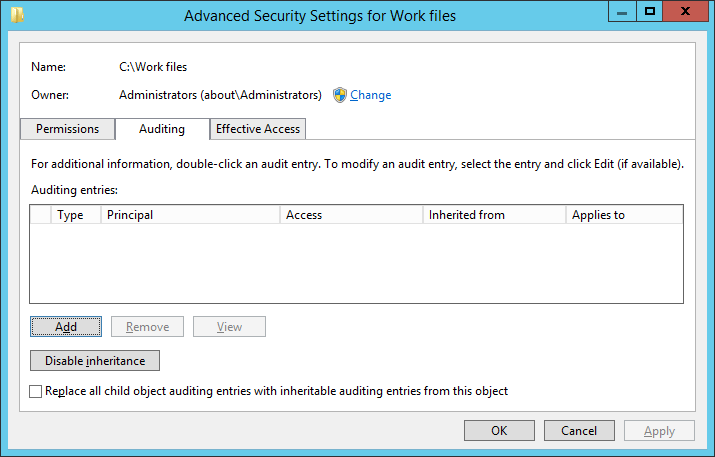
Figure 4: Auditing tab of “Advanced security settings” window - To create a new auditing entry, click “Add”. “Auditing Entry” window appears on the screen.
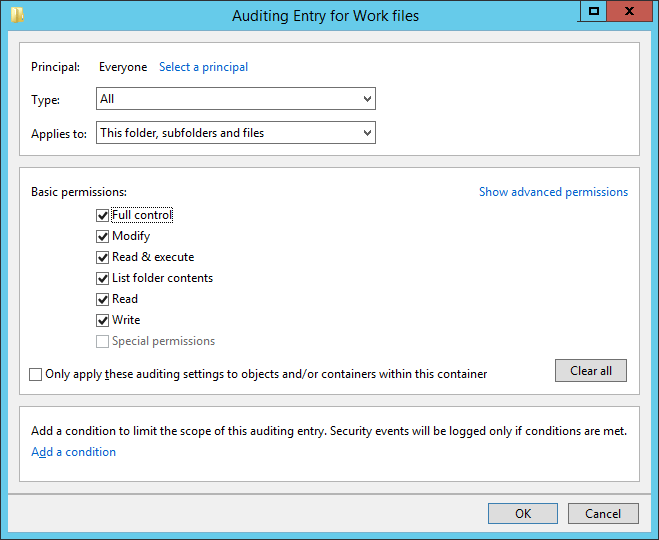
Figure 5: “Auditing entry” window of the folder - Click “Select a Principal” to choose users whose activities you want to track.
- “Select User, Computer, Service Account, or Group” dialog box appears on the screen. If you want to audit all users’ activities, enter “Everyone” in the “Enter the object name to select” dialog box, and click “Checknames”. In our case, we enter “Everyone”.
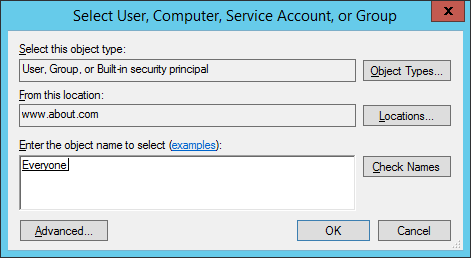
Figure 6: “Select users…” dialog box - Click “OK” to finalize your selection. It takes you back to “Auditing Entry” window.
- Select “All” in “Type” drop-down menu to monitor both successful and failure events. You can select “Success” to monitor only successful events or you can select “Failure” to monitor only failure events.
- In “Applies to” drop-down menu, select “This folder, subfolder, and files” option, if you want to audit all the subfolders and the files within this folder.
- Click “Show advanced permission” option in the permissions section to view all the permissions. Select all the actions that you want to audit. If you want to audit all the actions, click “Full Control” checkbox. Here, we have selected “Full Control” checkbox.
- Click “OK” to apply the auditing settings. It closes “Auditing Entry” window.
- Now on “Auditing” tab of “Advanced security settings” window, you can see the newly added audit entry.
- Click “Apply” and “OK” in the “Advanced Security Setting” window to close it.
- Click “Apply” and “OK” to close the folder properties window.
Step 3: View Events in Windows Event Viewer
After you have configured the above audit settings, you can track any change made to folders, subfolders, and files. For that, open “Windows Event Viewer” and go to “Windows Logs” ➔ “Security”. In the right pane, use the “Filter Current Log” option to find the relevant events.
Key Event IDs for File Server Auditing
For example, if anyone creates a new file, event ID 4656 and Event ID 4663 will both be logged. To illustrate this, in our case, a file has been created in the “Work files” folder. In the following image, you can see the details of the event ID 4656:
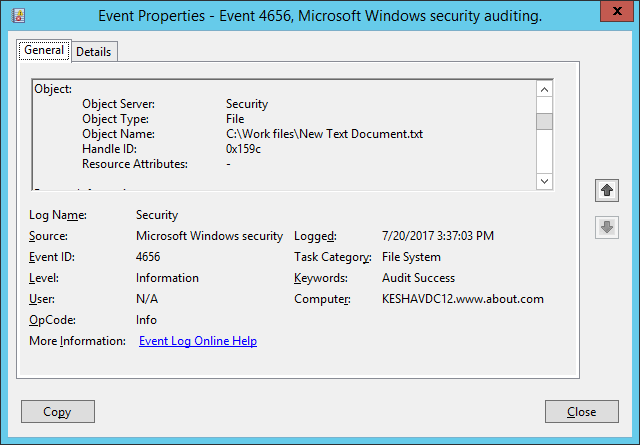
You can see the new file’s name (C:\Work files\New Text Document) which is visible after you scroll down the side bar.
The same event ID 4656 shows all accesses made to the objects, such as files and folders.
Limitations of Native Auditing
Native Windows auditing has several drawbacks to consider:
- Manual configuration required: Auditing must be enabled on each folder individually
- Noisy event logs: High volumes of events make it difficult to identify critical activities
- No real-time alerting: Administrators must manually review logs to detect issues
- Limited reporting: No built-in reports for compliance or trend analysis
- Storage concerns: Security logs can fill up quickly, potentially overwriting important events
Track File and Folder Activities Easily with Lepide File Server Auditor
Lepide File Server Auditor can be used to track all file and the folder activities of users. Unlike Native Auditing, you do not have to manually enable the auditing for different files and folders. You just have to install the solution and configure the audit settings once and you are good to go.
The following image shows the files and folder creation report. You can filter the records by any column; including file name, creation time, user name, and any other available column. All the necessary information related to the create event is shown in a single line record.
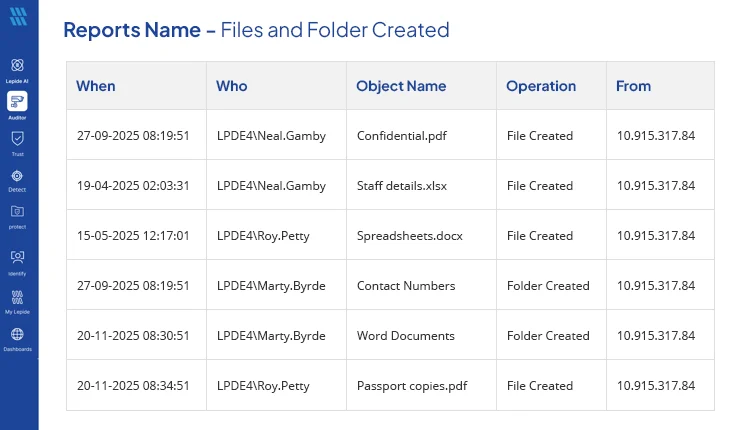
In the above image, we have highlighted the record which contains the information about where a file was created. Answers to all relevant audit questions, such as “who, what, when, and where” are available in a single line record.
Native Windows Auditing vs. Lepide File Server Auditor
Frequently Asked Questions
What is Event ID 4656?
What is the difference between success and failure auditing?
What are the limitations of native Windows auditing?
Which Event ID shows file deletion?
Conclusion
In this article, you have seen how to keep track of all files and folder activities on your Windows File Server using both native methods and Lepide File Server Auditor. Clearly the easier option, Lepide’s File Server auditing software can help you keep track of all the files and folders on your Windows File Servers.