Active Directory Auditing is the process of tracking and recording changes, access events, and security-related activities within a Windows Active Directory environment. Auditing Active Directory is necessary from both a security point of view and for meeting compliance requirements. Organizations majorly favor native Active Directory audit methods provided by Event Viewer (a large pool where events are stored in an unorganized manner). An experienced IT Auditor knows how to extract the meaningful events from this cluttered environment, but it takes time and patience. In this article, we will discuss how to enable the security auditing of Active Directory and how to extract its events from Event Viewer.
Enable the Security Auditing
Prerequisites
Before enabling Active Directory security auditing, ensure you have:
- Administrator permissions: Domain Admin or equivalent privileges to modify Group Policy Objects
- Group Policy Management Console (GPMC): Installed on your management workstation
- Supported Windows Server version: Windows Server 2016, 2019, or 2022
- Access to domain controllers: Ability to apply and verify Group Policy changes
For security auditing, it is required to either modify default domain policy or create a new Group Policy Object and edit it. You have to, in fact, deal with Advanced Audit Policy Configuration for this. Perform the following steps for enabling the security auditing of Active Directory.
-
- Go to Start Menu → Administrative Tools → Group Policy Management.
- In the left pane, navigate to Forest → Domains → Domain Name. Expand it.
- You can select either ‘Default Domain Policy’ or create a new Group Policy Object.
- Right-click on ‘Default Domain Policy’ or other Group Policy Object.
- Click ‘Edit’ in the context menu. It shows ‘Group Policy Management Editor’.
- Go to Computer Configuration → Policies → Windows Settings → Security Settings → Advanced Audit Policy Configuration → Audit Policies.It lists all audit policies in the right pane.
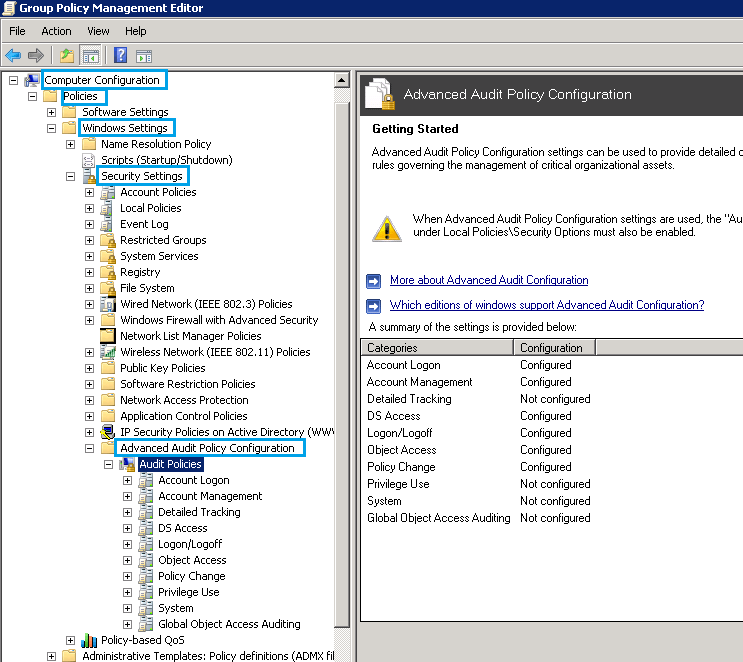
In order to configure all the policies, define the following categories and then configure them one after another
- For example, click on the first policy – Account Logon and configure the audit events of its subcategories one after another.
- Check Both Success and Failure
Enable the Global Object Access Auditing
Perform the steps below to audit the access of any object globally on the server.
-
- Go to Start Menu → Administrative Tools → Group Policy Management.
- In the left pane, navigate to ‘Forest → Domains → Domain Name. Expand it.
- You can select either ‘Default Domain Policy’ or create a new Group Policy Object.
- Right-click on ‘Default Domain Policy’ or another Group Policy Object.
- Click ‘Edit’ in the context menu. It shows ‘Group Policy Management Editor’.
- Go to Computer Configuration → Policies → Windows Settings → Security Settings → Advanced Audit Policy Configuration → Audit Policies. It lists all audit policies in the right pane.
- Go to ‘Global Object Access Auditing’ node under ‘Audit Policies’ of advanced configuration.
- Double click ‘Registry’ entry in the right details pane.
- Check the box ‘Define this policy’. It enables the subsequent button.
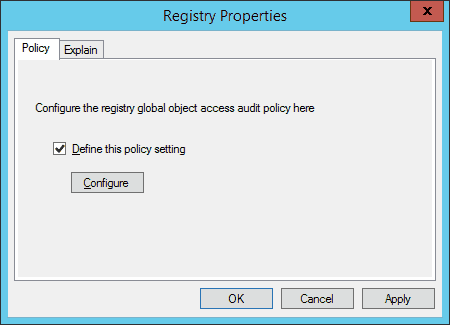
-
- Click ‘Configure’ to access the advanced Settings for Global Registry SACL’.
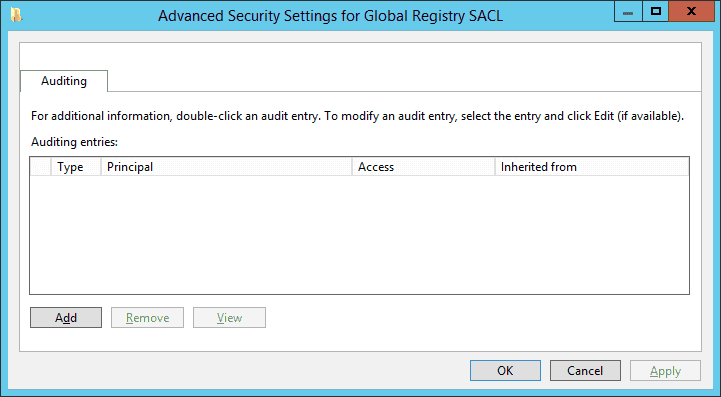
-
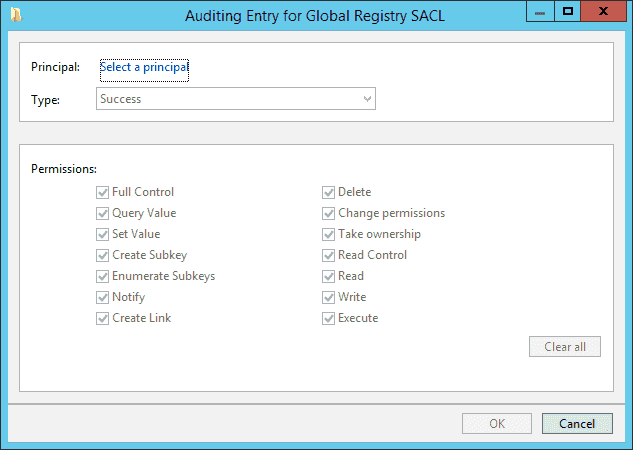
- Click ‘Add’ to add users or groups of which access you want to audit. It shows ‘Auditing Entry for Global Registry SACL’ window.
-
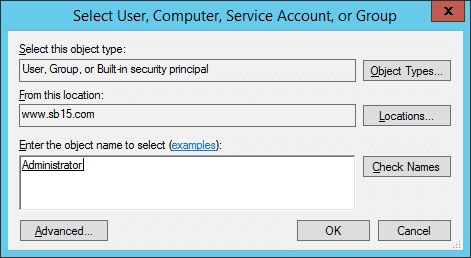
- Click ‘Select a Principal’ link. It shows ‘Select User, Computer, Service Account or Group’ dialog box on the screen.
-
- Type the name of a user or group of which access you want to audit.
- Click ‘Check Names’ button to validate the name.
- Click ‘OK’. It takes you back to ‘Auditing Entry’ window.
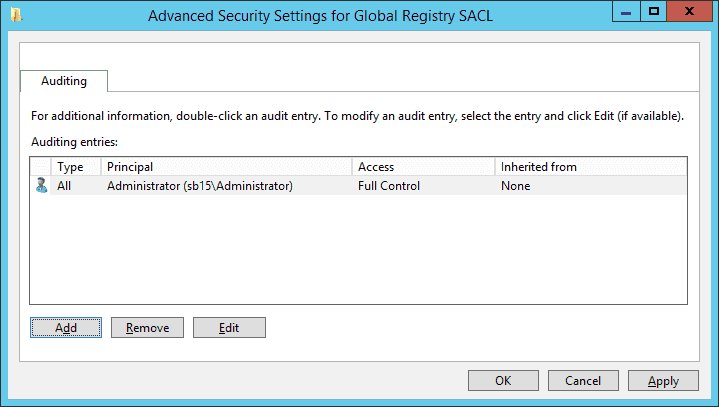
- Select ‘All’ in ‘Type’ drop-down menu.

-
- Please make sure all 16 permissions are checked.
- Click ‘OK’. It adds the rule to audit the selected user’s access to the registry and takes you back to ‘Advanced Security Settings’ window.
-
- Click ‘Apply’ and ‘OK’. It takes you back to event properties.
- Click ‘Apply’ and ‘OK’.
You can follow the similar above steps to configure ‘File System’ policy in ‘Global Object Access Auditing’.
Manage the Integrity of Advanced Auditing
The advanced auditing entries are often overwritten by the entries of basic auditing. Perform the following steps to configure that the advanced auditing entries will not be overwritten.
- Go to Start Menu → Administrative Tools → Group Policy Management.
- In the left pane, go to Forest → Domains → Domain Name. Expand it.
- You can select either ‘Default Domain Policy’ or create a new Group Policy Object.
- Right-click on ‘Default Domain Policy’ or another Group Policy Object.
- Click ‘Edit’ in the context menu. It shows ‘Group Policy Management Editor’.
- In the left tree pane, go to Computer Configuration → Policies → Windows Settings → Security Settings → Security Options.
- Double click ‘Audit: Force audit policy subcategory settings (Windows Vista or later) to override audit policy category settings’.
- Click ‘Define this policy setting’ and click ‘Enabled’.
- Click ‘Apply’ and ‘OK’.
Update Group Policy Object
Start the command prompt or ‘Run’ prompt as an Administrator and execute the following command.
-
- gpupdate /force
It applies the modified security auditing policies on the server. Alternatively, you can logoff and logon the Administrator.
Verify the Auditing Policies
It is the time to verify that the modified auditing policies have been applied or not. Run the following command on the Command Prompt.
-
- auditpol.exe /get /category:*
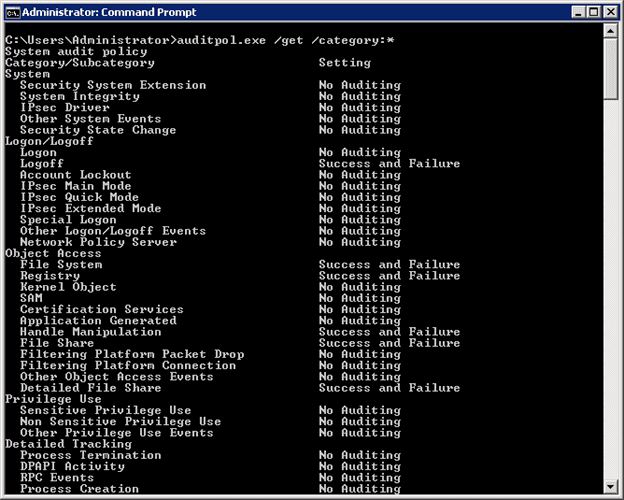
- It lists the status of all auditing policies (both basic and advanced) on the server. Please verify both ‘Success’ and ‘Failure’ events for the policies, which you have enabled.
Create Custom Views to Search Relevant Event IDs
Once the security auditing of Active Directory has been enabled, you receive these events in the Security section under ‘Windows Logs’ in Event Viewer. You can customize the view to keep a check only on critical and error logs. Follow the steps below:
-
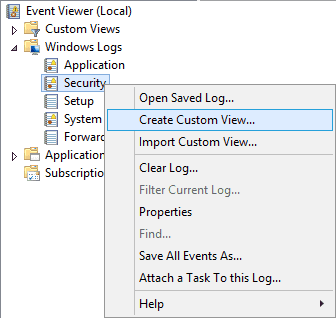
- Right-click on Security to access the context menu.
-
- Click ‘Create Custom View’ option. It shows the following dialog box.
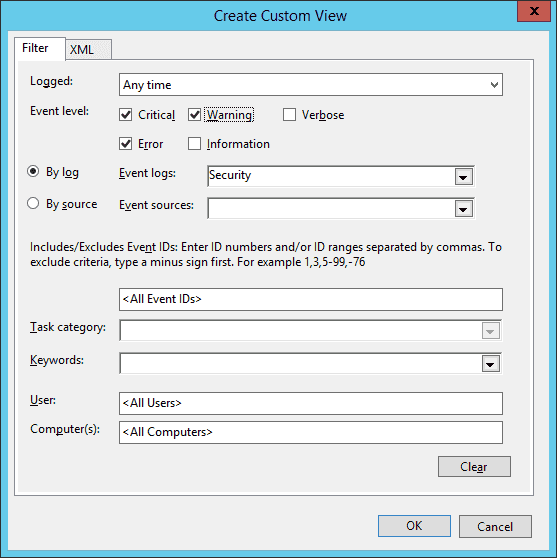
-
- Select ‘Critical’, ‘Error’, and ‘Warning’ to show only these types of logs in the new custom view. Keep ‘Security’ selected in ‘Event logs’.
- Click ‘OK’. It shows the following box to save the created view.
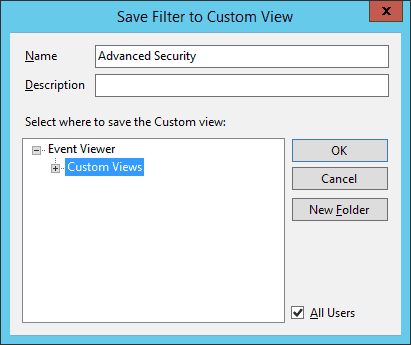
-
- You can provide a new name for this view.
- It will be displayed the node ‘Custom Views’. You can also create a new folder to save this node by clicking ‘New Folder’.
- A newly created custom view is displayed under ‘Custom Views’.
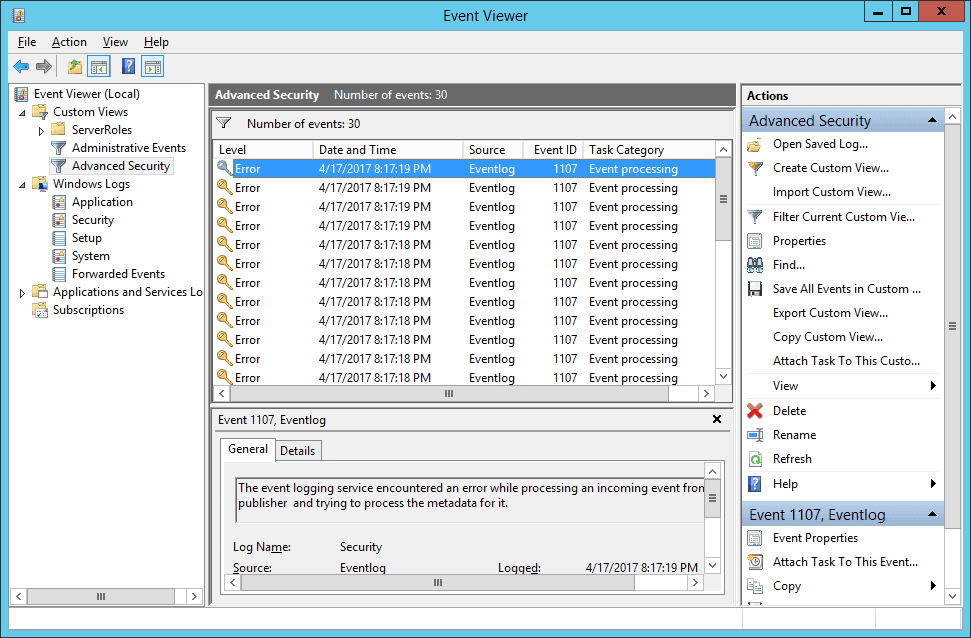
-
- Right pane in this window shows a list of actions you can perform such as
- Import Custom View: It lets you import the custom view, which can be exported later on.
- Filter Current Custom View: Click it to customize the current view using the same dialog box, which you used to create it.
- Properties: Click it to change the name and description of this view.
- Find: Click it to search in the current view.
Other basic options let you rename, delete, or refresh the view.
Common Event IDs Reference
Understanding key security event IDs helps you quickly identify important activities in your audit logs:
Drawbacks of Native Auditing
After enabling the security auditing, you can browse the Event Viewer and view the captured events in the ‘Security’ logs. However, there are several limitations:
- No predefined audit reports: Security auditing lacks built-in reporting templates for compliance or security analysis
- Event volume overhead: A single password change can generate 3-5 separate events, making log analysis time-consuming
- Limited object detail: No specific information about which object attributes were accessed or changed
- No before-and-after values: Changed objects don’t show previous values for comparison
- No built-in alerting: No native capability to alert on suspicious activity patterns or threshold breaches
- Storage constraints: Event logs are limited to 4GB maximum size by default, requiring manual archival
- No centralized view: Each domain controller maintains separate logs with no consolidated dashboard
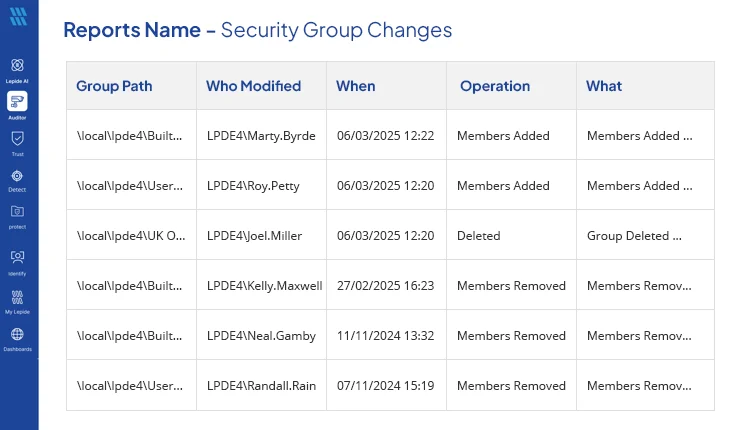
How Lepide Helps with Active Directory Auditing?
Lepide’s Active Directory auditing solution has many features to help you track and monitor changes being made to your Active Directory environment. It can audit following activities:
- Object creation, deletion and modifications
- Permission changes
- Security Settings
- Privileged User activities
- Track and Troubleshoot Account Lockouts
- Failed and Successful Logon/Logoff activities
- and more…
Lepide gives you complete visibility over the risks to your Active Directory security so that you can address potential vulnerabilities.
With pre-defined, compliance-ready reports, real time alerts and advanced anomaly spotting, you can identify unwanted or unauthorized changes to configurations and permissions. You can also generate real time threat response models to remediate the threats, fast.
Lepide Active Directory auditing solution allows you to simplify access rights by showing you who has privileged access and how they got it. You can also monitor often exploited attack paths by keeping track of logon/logoff activity, password resets, account lockouts and more.
Native AD Auditing vs. Lepide Auditor
Summary
You can follow the above steps to enable security auditing for Active Directory. Once the status has been verified, you can see the recorded events in the security logs of the Event Viewer. However, if this seems to manual or not detailed enough for your security purposes, you can use the Active Directory auditing functions of the Lepide Data Security Platform to simplify and improve your security auditing.
Frequently Asked Questions
For security-critical environments, review high-priority events (failed logons, privilege changes, account modifications) daily. Conduct comprehensive log reviews weekly or monthly depending on your compliance requirements and organization size.
Basic audit policies provide broad category-level auditing (e.g., “Audit account logon events”), while advanced audit policies offer granular subcategory control (e.g., separate settings for Kerberos authentication vs. credential validation). Advanced policies provide more precise control and reduce unnecessary event noise.
Retention requirements vary by compliance framework: PCI-DSS requires 1 year minimum, HIPAA recommends 6 years, and SOX requires 7 years. For general security purposes, retain logs for at least 90 days for incident investigation, with archived storage for 1-3 years.
Native AD auditing often generates multiple events for single actions. For example, a password change can create 3-5 events across different audit categories. This is expected behavior but can complicate analysis without third-party consolidation tools.