File and folder deletion auditing on Windows File Server is the process of tracking and logging when users delete files or folders from shared storage. This is accomplished by enabling object access auditing through Group Policy and configuring specific audit entries on the files and folders you want to monitor. When properly configured, Windows records deletion events in the Security log, allowing administrators to identify who deleted what and when.
Tracking who deleted files or folders on Windows File Servers is a vital part of both security and IT operations. If users are deleting files that contain sensitive information, they might be trying to hide something. Likewise, if important files are deleted, it could result in disruption to the business.
Either way, it’s important that you can audit file and folder deletion on File Server.
File and folder deletion auditing can be done for multiple file servers in your network by enabling object access auditing through GPO and then configuring auditing on the required files and folders that you want to audit.
Administrators, after that, can easily track these events in Windows security logs. You will have to follow these three steps:
- Enable “Audit Object Access” through GPO.
- Enable Auditing of Files and Folders
- Track File and Folder Deletion Events in Event Viewer
Prerequisites
Before you begin, ensure you have the following:
- Supported Windows Server versions: Windows Server 2012, 2016, 2019, 2022, or 2025
- Required permissions: Domain Admin or equivalent privileges to modify Group Policy and folder security settings
- Important: Auditing must be enabled before deletion events occur—Windows cannot retroactively log deletions that happened prior to enabling auditing
Key Event IDs for File Deletion Auditing
Step 1 – Enable “Audit Object Access”
Perform the following steps to enable this group policy.
- On the primary domain controller, open “Group Policy Management”.
- You have to edit either “Default Domain Policy” or create a new domain level policy and link it.
- Edit the default or a customized Group Policy to access “Group Policy Management Editor”.
- Go to “Computer Configuration” – “Windows Settings” – “Security Settings” – “Local Policies” – “Audit Policy” – “Audit object Access”.
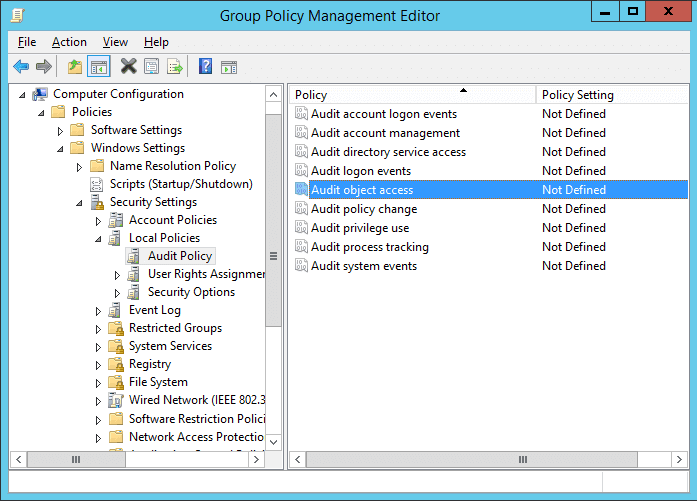
Figure 1: Audit Object Access - Double-click this policy to open “Properties” window
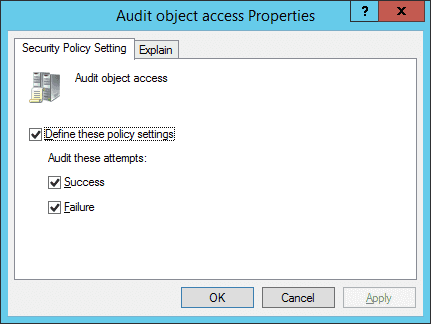
Figure 2: Properties of Audit Object Access - Click the “Define these policy settings” checkbox.
- Now, click “Success” and “Failure” under “Audit these attempts”.
- Click “Apply” and “OK”.
- Close “Group Policy Management Editor” and “Group Policy Management Console”.
Step 2 – Enable Auditing of Files and Folders
Perform the following steps to enable the auditing of selected files or folders.
- In Windows File System, use Windows Explorer to select the folder that you want to audit.
- Right-click it and select “Properties”.
- Go to the “Security” tab.

Figure 3: “Security” Tab of Folder Properties - Click “Advanced” to access “Advanced Security Settings”. In the “Advanced Security Settings” window, go to the “Auditing” tab. It displays the existing auditing entries (if there are any).
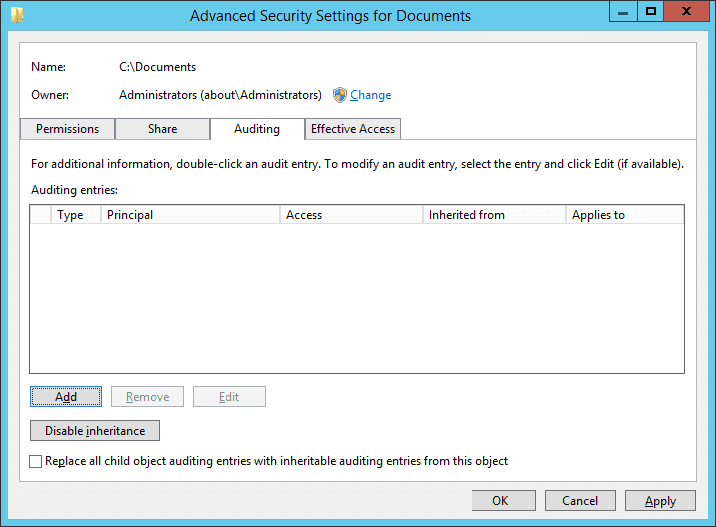
Figure 4: “Auditing” tab in “Advanced Security Settings.” - To add a new entry, click “Add”. “Auditing Entry” window appears on the screen.
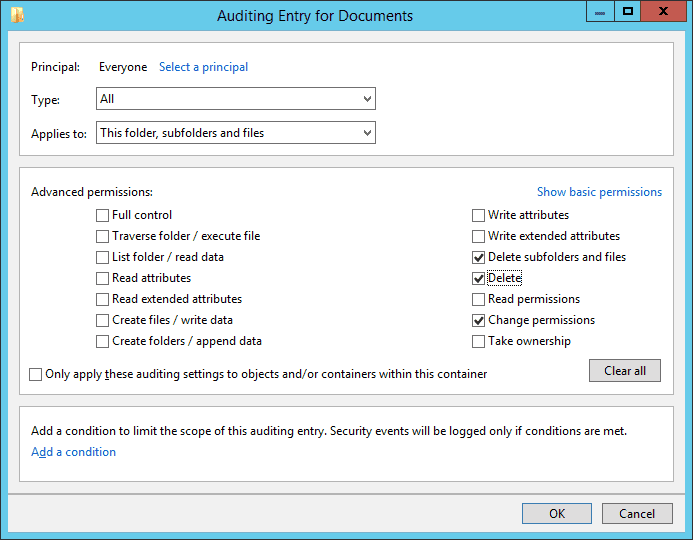
Figure 5: Configuring auditing entry Note: You can select ‘Change Permissions’ if you want to audit permissions changes. Learn more
- Click “Select a Principal” to select users whose activities you want to track. If you want to audit all users’ activities, enter “Everyone” in the “Enter the object name” box.
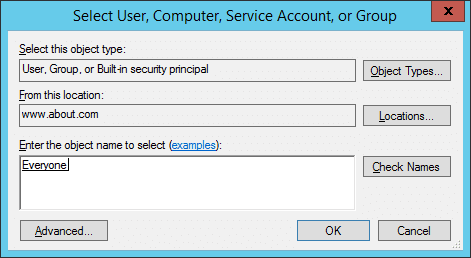
Figure 6: Select users for auditing - Click “Check Names” to verify the provided input.
- Click “OK” to select the object. It takes you back to the “Auditing Entry” window.
- In “Type” field, select “Success”,” Fail”, or “All”.
- In the “Applies to” field, select “This folder, subfolder, and files”. Then, all the subfolders and files within this folder will be tracked.
- Click the “Show advanced permission” option in the permissions section to view all the permissions.
- Here, select the activities that you want to audit. For tracking file and folder deletion, you will have to select the “Delete”, and “Delete subfolders and files” options.
- Click “OK” to close “Auditing Entry” window. It takes you back to the “Auditing” tab of advanced security settings, which now displays the newly added user.
- Click “Apply” and “OK” in “Advanced Security Setting” window.
- Click “Apply” and “OK” to close the folder properties.
Step 3 – Search Relevant Event IDs in Event Viewer to Track Deleted Files and Folders
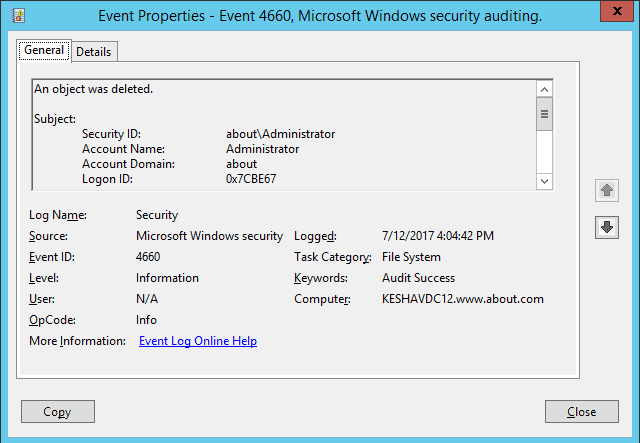
Open Windows Event Viewer – Go to “Windows Logs” – “Security” – “Filter Current Log” – Search Event ID 4660 for file and folder deletion.
In the following image, you can see the event id 4660 which has been logged after a folder has been deleted. However, the object’s name is not visible. In the next image, you can see the objects name as well which has been logged at the same time.
The delete event ID 4660 does not contain the object name, so you have to view event ID 4663 to get that information. In the following image, which shows event 4663 (folder delete event), the object name (C:\Documents\Projects) is also visible.
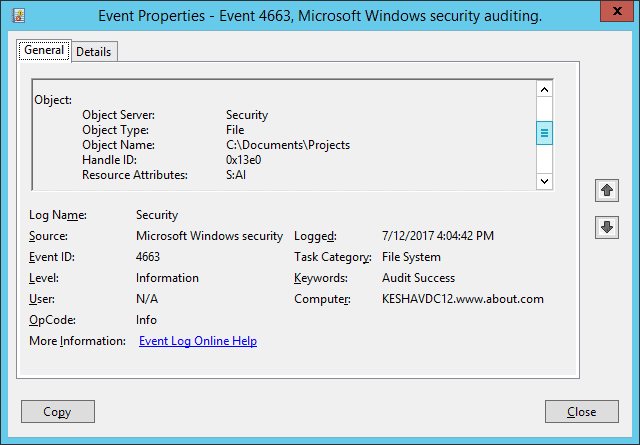
Here, you can see that time to log both event IDs 4660 and 4663 is the same.
Using PowerShell to Filter Deletion Events
You can also use PowerShell to filter Security logs for deletion events:
# Get Event ID 4660 (deletion occurred) Get-WinEvent -FilterHashtable @{LogName='Security';ID=4660} -MaxEvents 50
# Get Event ID 4663 (includes object name) Get-WinEvent -FilterHashtable @{LogName='Security';ID=4663} -MaxEvents 50
# Filter 4663 events for delete operations Get-WinEvent -FilterHashtable @{LogName='Security';ID=4663} | Where-Object {$_.Message -like "*Delete*"}
Troubleshooting Common Issues
If deletion events are not appearing in your Security logs, check the following:
- GPO replication delays: Run gpupdate /force on the file server to immediately apply policy changes
- Incorrect audit settings: Verify that both “Success” and “Failure” are enabled in the Audit Object Access policy
- Auditing not enabled at time of deletion: Windows cannot log events retroactively; auditing must be configured before the deletion occurs
- Log size limitations: The Security log may have reached its maximum size and is overwriting old events; increase the log size or archive logs more frequently
- Missing folder-level auditing: Ensure auditing entries are configured on the specific folders you want to monitor (Step 2)
Native Auditing vs. Third-Party Tools
How Lepide File Server Auditor Tracks Files and Folders Deletion
As we’ve seen from the above, tracking file and folder deletion in File Server using native auditing is cumbersome, error-prone, and lacks critical audit information.
Thankfully, there’s a better way.
Lepide File Server Auditor effortlessly tracks file and folder deletions with proactive and continuous monitoring. The following image shows the files and folders deletion report. You can see all necessary information related to files and folders deletion is displayed in a single line record.
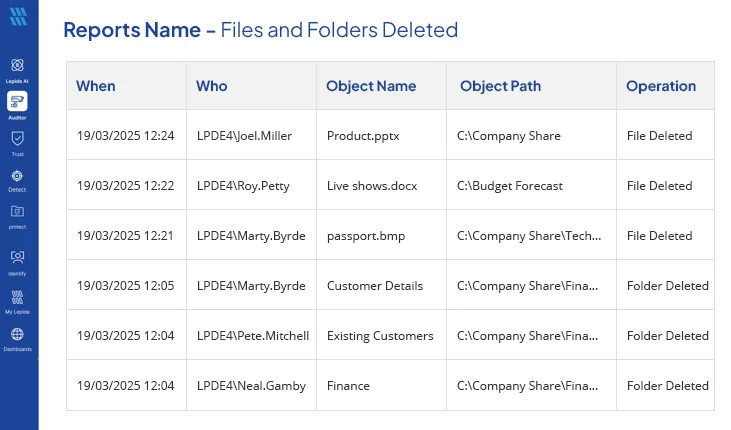
The highlighted record, which shows “Projects” in the “Object Name” column shows the same event in Lepide File Server Auditor.
Watch the video below to see how Lepide helps track file and folder deletion activities.

So, when it comes to tracking file and folder deletion, native auditing clearly doesn’t provide as much value as Lepide File Server Auditor.