An Account Lockout Policy is a built-in security policy through which the system administrators can set the conditions of how long and at what time a user account is going to be locked. It is a way to make sure that attackers are not able to carry out brute force attacks to figure out the user’s password. Such configuration can be done either from the local security policy of the computer or through the network administrator’s Group Policy Management Console.
How to Change the Account Lockout Policy
To change or edit the Account Lockout Policy settings, follow the below steps:
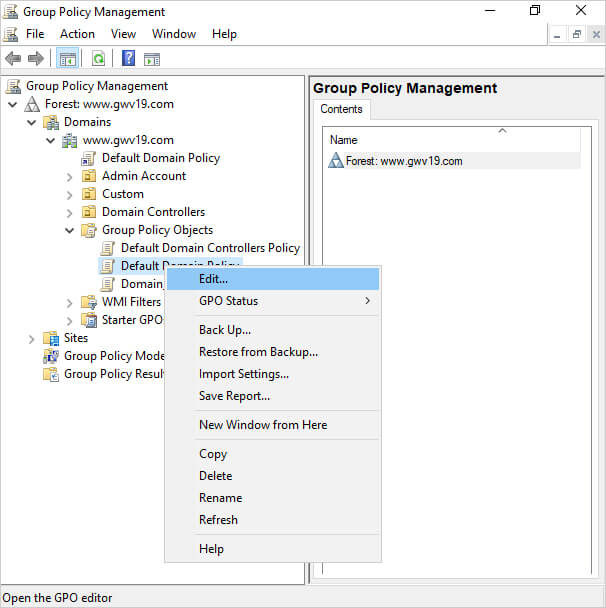
- Open the Start Menu → Administrative Tools → Group Policy Management. Alternatively, press Windows + R, type gpmc.msc, and press Enter.
- Locate Domain Group Policy Object (GPO): Expand Forest → Domains in the console tree. Click the domain name used.
- Right-click “Default Domain Policy” (or the GPO where you want to set the policy), and then click “Edit” to open Group Policy Editor.
- In the Group Policy Editor, go to Computer Configuration → Policies → Windows Settings → Security Settings → Account Policies → Account Lockout Policy
- By double clicking Account Lockout Policy, three different account lockout settings can be seen that are available in AD. To define the policy setting → Right Click and setting → select Properties
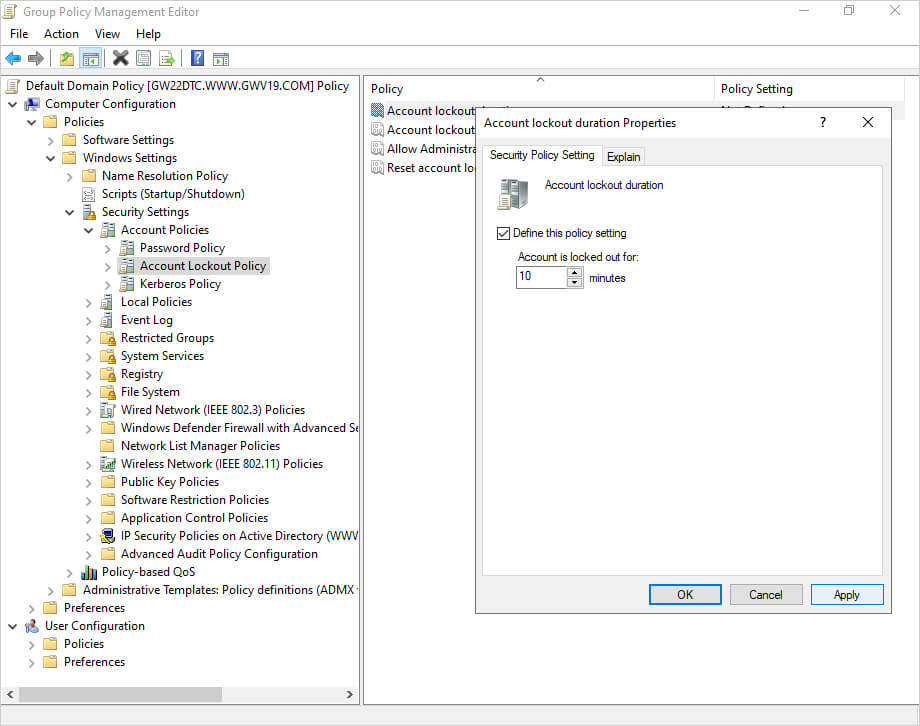
- On the Security Policy Setting tab → Tick the Checkbox to define the Policy Setting and enter the required value.
- Click Apply and then OK

Three Major Parameters in the Account Lockout Policy within Active Directory are:
1. Account Lockout Duration
The account lockout duration determines how many times in a row a user can try to sign in with wrong credentials before the user account is locked. The number can be anywhere between 0 to 99,999 minutes. If 0 is chosen, the account will be locked until an administrator manually unlocks it.
Use ADUC to right-click a user whose account is locked out and then select Properties. On the Account tab of user properties, unlocking the account can be done by checking the Unlock Account checkbox.
2. Account Lockout Threshold
The Account lockout threshold indicates the duration (in minutes) for which the account will be locked after it has been locked out due to the threshold being reached. The number can be from 0 to 999. If 0 is set, the account will never be locked automatically. This parameter must be set a value for the lockout duration and reset counter to work.
3. Reset Account Lockout Counter After
The reset account lockout counter specifies the period (in minutes) for which the failed login attempts counter will be reset to zero if no other failed attempts occur. Hence, if the user does not perform any failed logon attempts during this time, the count will be reset, and the user will be given another chance before the account is locked. The value can be between 1 and 99,999 minutes and has to be less than or equal to the lockout duration.
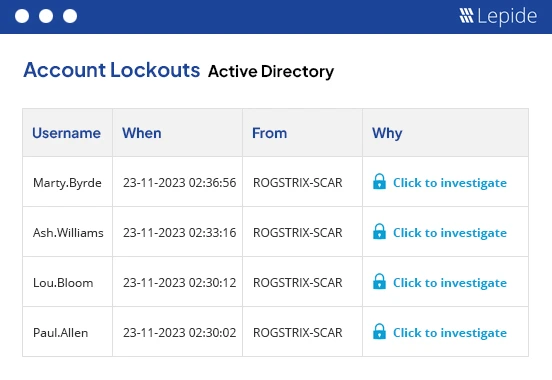
How Lepide Account Lockout Examiner Free Tool helps
Account lockouts can disrupt business operations by preventing employees from accessing the resources they need. The Lepide Account Lockout Examiner Free Tool enables administrators to quickly identify the source of lockouts and investigate their root cause. It also allows you to unlock accounts and reset passwords for locked out users, ensuring minimal downtime and continuity of access.