Protecting credentials is one of the most important aspects of Windows security. Attackers know that if they can compromise user logins or service accounts, they can escalate privileges and move laterally across your environment. One of the most common targets in these attacks is the Local Security Authority Subsystem Service (LSASS), since it stores and manages sensitive authentication material in memory. To combat this, Microsoft introduced LSA Protection, a feature designed to shield LSASS from credential theft.
What is Local Security Authority (LSA) Protection and Why You Should Enable It?
Local Security Authority (LSA) Protection is a Windows security feature that runs the Local Security Authority Subsystem Service (LSASS) as a protected process to prevent credential theft attacks.
When LSA Protection is enabled, LSASS runs as a protected process (RunAsPPL mode). This means only trusted, digitally signed Windows components can interact with it. Unauthorized programs, even those with local administrator rights, cannot inject code into LSASS or read its memory. This makes common credential dumping techniques far more difficult, adding an extra layer of defense against credential theft and privilege escalation attacks.
In short, LSA Protection locks down one of the most attractive targets for attackers on Windows systems. It’s not a silver bullet, but it significantly raises the barrier for anyone attempting to steal credentials from your environment.
Key Benefits of LSA Protection
- Blocks code injection into the LSASS process
- Prevents unauthorized processes from reading LSASS memory
- Stops credential dumping tools like Mimikatz from extracting credentials
- Protects NTLM hashes and Kerberos tickets stored in memory
- Adds defense-in-depth against privilege escalation attacks
Requirements and Prerequisites
Before enabling LSA Protection, ensure your environment meets the following requirements:
- Operating System: Windows 8.1 or later, Windows Server 2012 R2 or later
- All LSA plug-ins and drivers must be digitally signed with a Microsoft certificate
- Administrative privileges required to modify registry settings or Group Policy
How to Enable LSA Protection?
Method 1: Using Registry Editor
- Open Registry Editor by pressing Win + R, typing regedit, and pressing Enter.
- Navigate to HKEY_LOCAL_MACHINE\SYSTEM\CurrentControlSet\Control\Lsa.
- Right-click in the right pane and select New > DWORD (32-bit) Value.
- Name the new value RunAsPPL.
- Double-click RunAsPPL and set the value data to 1.
- Click OK and close Registry Editor.
- Restart the computer for changes to take effect.
Method 2: Using PowerShell
Execute the following command in an elevated PowerShell session:
New-ItemProperty -Path "HKLM:\SYSTEM\CurrentControlSet\Control\Lsa" -Name "RunAsPPL" -Value 1 -PropertyType DWord -ForceMethod 3: Using Group Policy
To deploy LSA Protection across all devices on your network via Group Policy, create a registry preference that sets the RunAsPPL value:
Windows Registry Editor Version 5.00
[HKEY_LOCAL_MACHINE\SYSTEM\CurrentControlSet\Control\Lsa]
"RunAsPPL"=dword:00000001
The setting for LSA can be found at SYSTEM\CurrentControlSet\Control\Lsa
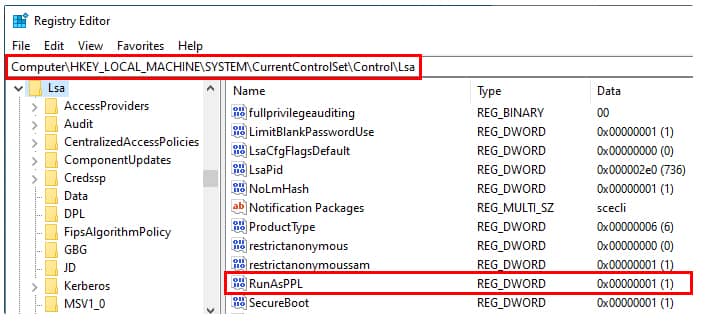
Image credit: https://itm4n.github.io/lsass-runasppl/
How to Verify LSA Protection is Enabled?
After enabling LSA Protection, confirm it is active using one of these methods:
1. PowerShell Command:
Get-ItemProperty -Path "HKLM:\SYSTEM\CurrentControlSet\Control\Lsa" -Name "RunAsPPL"A value of 1 confirms LSA Protection is enabled.
2. Event Viewer:
- Open Event Viewer and navigate to Windows Logs > System.
- Look for Event ID 12 from the Wininit source, which confirms LSASS started as a protected process.
Limitations of LSA Protection
While LSA Protection significantly improves credential security, it does not protect against:
- Attacks that occur before LSASS starts or during system boot
- Credential theft from other sources (e.g., cached credentials on disk, browser-stored passwords)
- Kernel-level attacks from signed malicious drivers
- Phishing or social engineering attacks that capture credentials directly from users
LSA Protection vs. Related Security Features
| Feature | Purpose | Requirements |
|---|---|---|
| LSA Protection (RunAsPPL) | Protects LSASS from code injection and memory reading | Windows 8.1+/Server 2012 R2+ |
| Credential Guard | Isolates credentials in a virtualization-based secure container | Windows 10 Enterprise, UEFI, TPM |
| HVCI (Hypervisor-Protected Code Integrity) | Prevents unsigned kernel code execution | Virtualization support, Windows 10+ |
LSA Protection is a software-based defense that works on a wider range of systems, while Credential Guard provides stronger isolation but requires specific hardware and Windows editions.
Best practices for Testing LSA Protection
According to Microsoft’s documentation about Configuring Additional LSA Protection, before you deploy LSA protection across your entire network it is a good idea to identify all LSA plug-ins and drivers that are in use within your organization. You should also check that all LSA plug-ins are digitally signed with a Microsoft certificate, that correctly signed plug-ins can successfully load into LSA and that they perform as expected. You can also use the audit logs to identify LSA plug-ins and drivers that fail to run as a protected process. If you want to streamline the process, you can use a PowerShell script to check if LSA is correctly enabled on a specific machine and to perform the necessary checks and balances to ensure that it is functioning as it should be.
Frequently Asked Questions
No, LSA Protection is not enabled by default on most Windows installations. Administrators must manually enable it via the registry or Group Policy.
Some third-party security tools, antivirus software, or legacy applications that interact with LSASS may not function correctly. Test in a pilot environment before broad deployment.