In Windows environments, NTFS permissions are used for regulating access to files and folders. Although administrators possess the knowledge to establish or modify these permissions, effectively and systematically managing permissions for extensive user groups can be challenging. Below is a simple guide to setting up and safeguarding NTFS Permissions using effective permissions management strategies.
NTFS Permissions Levels
The correct configuration of NTFS permissions allows individuals and groups to gain access to directories. Unlike share permissions, which provide only three permission levels (Read, Change, and Full Control), NTFS permissions offer a more detailed level of control. To set NTFS permissions, simply right-click on a file or folder, choose “Properties,” and navigate to the “Security” tab. From there, you can select permissions or access further settings and special permissions by clicking on “Advanced.”
Various NTFS permission levels are available, including:
- Full Control: This grants complete access, allowing users to view, read, write, execute, and delete files or folders. It also permits the modification of permission settings for all subdirectories.
- Modify: Users with this permission level can view, read, execute, write, and delete files. Additionally, they can delete the folder itself.
- Read & Execute: This level enables users to view folder contents and run programs or scripts.
- List Folder Contents: Users can see the files and directories within a folder, which is crucial for navigating deeper levels in the folder structure.
- Read: Users are able to see folder contents and open the files and folders within.
- Write: This permission level allows users to add new files and folders, as well as write to existing files.
- Special permissions: These additional options, accessible through the Advanced Security Settings in the Windows file system, include Read Attributes, Create Files, Delete Subfolders and Files, and Traverse Folder.
To effectively manage permissions for Windows networks, it is important to understand the relationship between NTFS and Share Permissions. Share Permissions and NTFS Permissions can be combined to administer file shares, with the more restrictive permission taking precedence. For example, if the Share Permission is set to Change and the NTFS permission is set to Read, users will only be able to read the file.
However, since NTFS permissions provide more precise access control options, it is advisable to maintain Share permissions at a higher level (Full Control for administrators and Change for regular users) and define the specific permission level using the NTFS system. This approach offers more detailed control and helps avoid conflicts between the two types of permissions. It’s a key element of successful permissions management in enterprise environments.
Common Mistakes When Configuring NTFS Permissions
Granting direct access to users
The primary mistake made by administrators is granting NTFS permissions directly to individuals instead of managing permissions through groups. Although this may seem like a quick solution initially, it often causes issues when modifications or evaluations of permissions are needed. While it may require time and effort to establish and manage global user groups and local permission groups based on Microsoft’s AGDLP principle, it is much simpler than attempting to keep track of numerous individual permissions.
Another issue is the lack of transparency. While it is easy to determine which groups a user belongs to by examining their account, any direct access granted to them will not be displayed in this list. Instead, you would need to inspect the properties of the specific directory to view the permission entry. Moreover, if the user is later deleted, their entries in the Access Control List will remain as orphaned SIDs, cluttering your Active Directory. Proper permissions management software can help mitigate these risks by offering centralized views and cleanup tools.
Assigning permissions to user groups
Instead of adding organizational groups to dedicated permission groups for accessing specific resources, it is common to assign permissions directly to groups of users. However, user groups should only be used to group staff members with the same business role who require access to the same files and folders. Assigning permissions directly to user groups creates a lack of transparency as it becomes difficult to determine which permissions the group holds, further complicating permissions management efforts.
Reusing permission groups
Even administrators who establish NTFS permissions through dedicated permission groups often make the mistake of reusing groups to grant additional permissions that go beyond the group’s intended purpose. It might be tempting to modify an existing group to conveniently add or change permission levels. However, when using the same AD group to assign new access rights, the members of the group end up with more permissions than what the group name implies. This creates confusion and misrepresentation when generating permission reports. Furthermore, when new users are later added to the group, they will receive more access than indicated by the group name, potentially leading to privilege creep and increasing the risk of insider threats.
Ignoring conventions
Whenever you stray from established methods, be it in group usage or naming conventions, things can rapidly descend into chaos. To maintain clarity and prevent misunderstandings, it is essential for all administrators to consistently adhere to the same standard. This is one of the major factors that make the implementation and management of permissions challenging.
Best Practices for Managing NTFS Permissions
We’ve covered what actions to avoid when managing permissions. So let’s now focus on the proper approach to handling NTFS permissions. There are multiple factors to consider, but to assist you in getting started, below are the most notable best practices for safely and efficiently managing NTFS permissions.
- Adhere to a standardized process: In order to ensure a consistent approach in granting access, naming groups, and adding new directories, it is imperative to create a standardized process. Having clear documentation serves as a reliable reference point whenever uncertainties arise, especially when dealing with unique situations. When aiming for a uniform approach across a large team of administrators, it becomes necessary to establish formal, written policies as there are no alternatives to ensure consistency in permissions management.
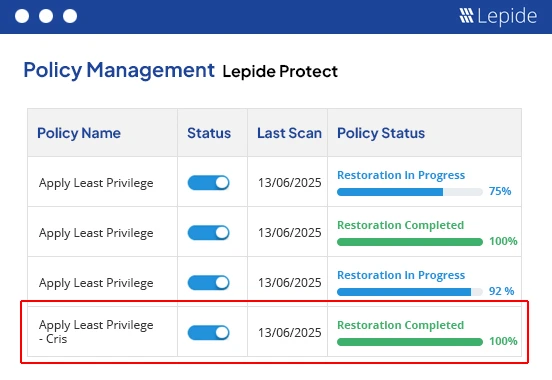
- Implement Least Privilege Access: The Principle of Least Privilege mandates that every user should be granted the lowest possible level of access needed to perform their duties. By removing superfluous permissions, the risk of exploitation during a cyberattack is minimized. This principle is a fundamental aspect of contemporary security frameworks like Zero Trust, as well as several compliance standards such as ISO 27001, NIST CSF, and HIPAA.
- Use groups whenever possible: It is always recommended to use permission groups to establish NTFS permissions. Avoid assigning NTFS permissions directly to individual users or objects, as this makes it difficult to manage permissions effectively. Furthermore, if a user is removed from the Active Directory, directly assigned permissions can result in orphaned entries in the access control list. Implementing a reliable permissions management software solution can streamline this entire process.
- Restrict the creation of new folders at the root level: To maintain an organized folder structure and prevent random items from cluttering the root directory, it is advisable to prevent users, including executives and managers, from creating new folders at the root level. Instead, it is recommended to solely grant IT the authority to add new directories.
- Avoid granting full control: Regular users do not require Full Control permission in any circumstances. The Modify permission already grants them the capability to create, edit, and delete files, while Full Control only extends to changing settings and permission levels, which is not desired for ordinary staff members.
- Avoid creating too many levels: Do not set explicit NTFS permissions on deep levels in the directory tree. Stick to two or three levels for explicit permissions to keep things simple and let permission inheritance take care of the rest. Otherwise, the number of permission groups and list groups you need quickly grows out of control. Since Windows actually puts a hard limit on the number of groups a user can be part of, having too many of these groups can lead to not all permissions being read correctly.
- Avoid Breaking Inheritance: Permissions on each folder level in Windows can be customized by breaking inheritance. This allows for the creation of unique NTFS permissions that are not inherited from higher-level folders. However, it is advised to refrain from using this feature as it complicates the understanding of NTFS permissions. Consequently, permission structures can become disorganized and perplexing.
- Use Access Based Enumeration: Windows 2003 R2 introduced Access Based Enumeration (ABE), which provides the ability to hide folders from users lacking appropriate access rights. Enabling ABE brings about a significant enhancement in user experience, sparing them the laborious task of sifting through countless directories to locate the particular folder they require.
- Show folder contents for higher-level directories: Permissions granted for a subdirectory do not automatically extend to navigating through subfolders. While users have the option to enter the exact path in the Explorer address bar to access the subfolder, most prefer using the graphical user interface (GUI). To enable users to reach their desired folder using the GUI, it is essential to provide them with list permissions (“Show folder contents”) for higher-level directories. The most efficient approach is to assign users to dedicated list groups, which automatically grant them the necessary permissions once they gain access to a resource. However, it is vital to restrict inheritance during this process to ensure that users can only view the contents of the specific folder they need to navigate, otherwise, users would have unrestricted access to browse all directories on the file server.
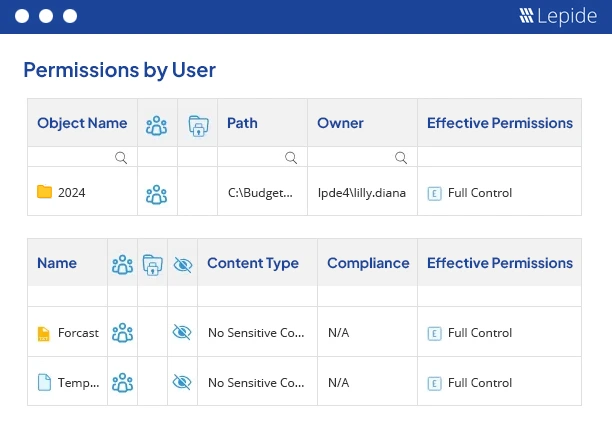
How Lepide Helps Manage NTFS Permissions
Lepide provides a smarter way to manage and report on NTFS permissions challenges with powerful, purpose-built tools. With Lepide Trust, organizations can gain visibility into who has access to what, how that access was granted, and whether it aligns with the principle of least privilege. It helps you understand your current access landscape, remove excessive permissions, and track changes continuously, making managing permissions across your file servers much easier and far more secure.
Meanwhile, Lepide Protect adds an extra layer of defense by monitoring user behavior and triggering alerts for suspicious activities, such as privilege escalations or unauthorized access to sensitive data. Combined, these tools act as a comprehensive permissions management software suite that simplifies access reviews, enforces policies, and helps reduce the risk of data breaches caused by misconfigured permissions.